This post may contain affiliate links. Please read our disclosure policy.
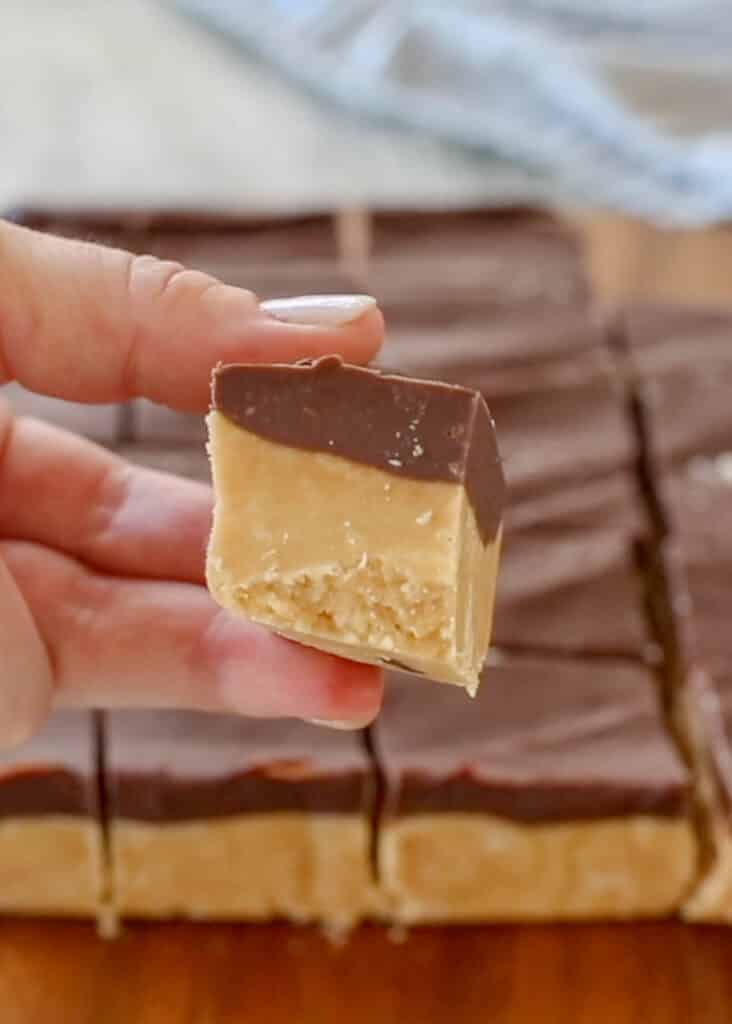
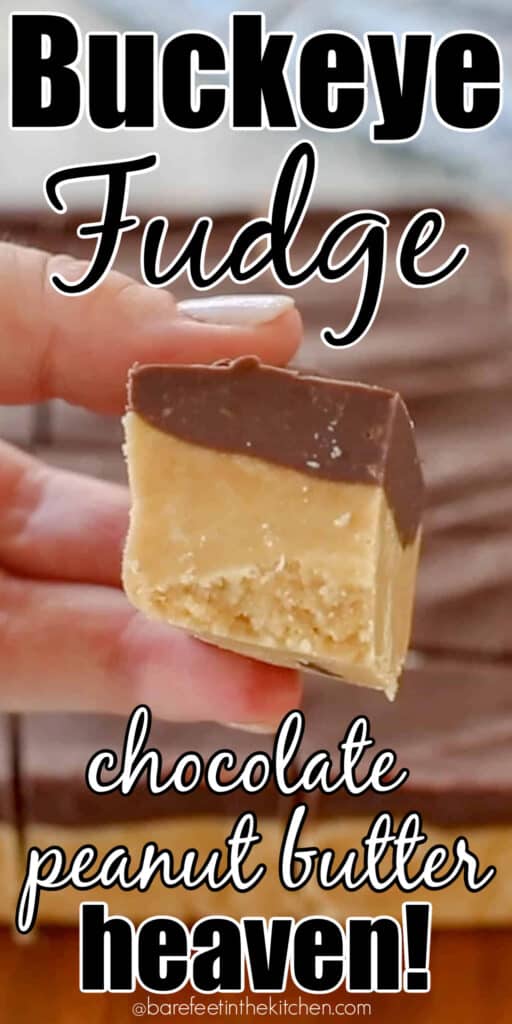
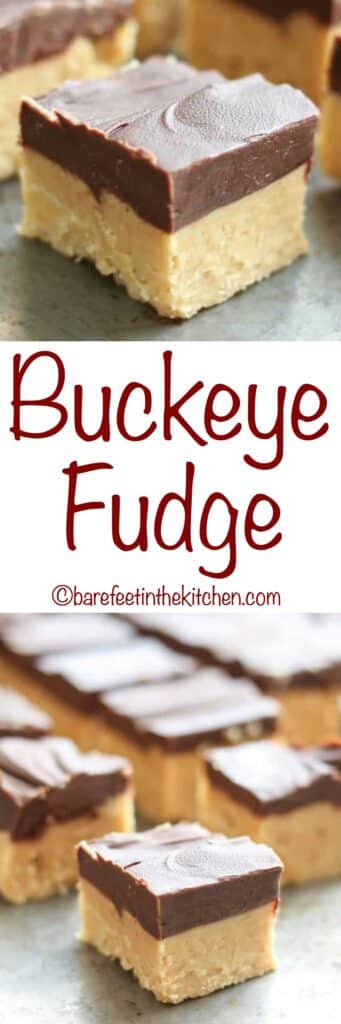
Buckeye Fudge is what happens when you combine creamy peanut butter fudge with smooth, rich, dark chocolate fudge.
This is a simple recipe for creamy peanut butter fudge with chocolate on top and it tastes just like the ever-popular buckeye candies.

Buckeye Fudge
This was my answer to a craving for buckeye candy on a day when I simply didn’t have much time to spend in the kitchen. Buckeyes (a.k.a. Peanut Butter Balls) are a popular classic candy for a good reason; those cute balls of peanut butter fudge dipped in a chocolate coating are everybody’s favorite.
If you’re not familiar with buckeyes, they’re balls of peanut buttery fudge, dipped in chocolate. Buckeyes are especially popular in Ohio because they resemble the nuts that grow on the state’s native Buckeye trees but you don’t have to be an Ohio-an to find them delicious.
I mean, it’s chocolate and peanut butter–How could you go wrong?!
Most of the time though, I just don’t have the time or motivation to roll and dip all of those little balls of peanut butter goodness. This fudge takes just a few minutes of prep time and a few hours to set in the fridge while you get other tasks done.
My kids absolutely flipped for this fudge, and I kept going back for just one more taste. I finally resorted to sending the rest of the fudge off to work with Sean, so that I wouldn’t eat the whole batch myself.
As a salty snack kind of girl, I usually don’t have that kind of self-control issue around sweets. That’s how irresistible this chocolate and peanut butter fudge was!
Buckeye Fudge is going on our Christmas baking list and it’s sure to be a favorite for years. I love finding shortcut and simplified methods to re-make our favorite recipes!
This Buckeye Fudge recipe is over the top simple. It only takes about 10 minutes to get all the ingredients prepped (if that) and can be made without even turning on the stove.
Chocolate and Peanut Butter Fudge
Buckeye candies were the inspiration for this recipe but the combination of chocolate and peanut butter fudge is one almost everyone loves.
Flourless Double Chocolate Peanut Butter Cookies and this Chocolate Peanut Butter Ice Cream are just two of the dozens of dessert recipes I’m crazy for that use a combo of sweet chocolate and salty peanut butter.
How to Make Buckeye Fudge
At its core, this fudge is a blend of two of my all-time favorite easy fudge recipes. And I wasn’t kidding when I said it’s ridiculously easy and fast to make!
Stir together Creamy Peanut Butter Fudge (5-minute recipe), pour it into a pan and then top it with this simple variation on Easy Chocolate Fudge (also a 5-minute recipe). Let it cool, slice, and eat!
The layers of smooth dark chocolate with rich peanut butter set up well at room temperature after about four hours. Personally, I like to eat this fudge after it’s been chilled in the refrigerator.
Even though I’m not usually a fan of microwave cooking, skipping the stovetop makes these fudge recipes a breeze. The peanut butter and butter melt together perfectly this way in the peanut butter fudge recipe, then all it takes is mixing in the powdered sugar.
The microwave method for the chocolate fudge recipe ensures that the chocolate melts quickly and without burning, each and every time.
If you don’t have a microwave (or prefer not to use it), you can definitely make both the original recipes at the Buckeye Fudge variation without. By popular request, directions are included for both microwave and stove-top preparation in the recipe below.
I’ve listed the fudge recipe as making 48 servings, based on a standard size square of fudge. However, I liked my bites sliced even smaller, (this fudge is rich!) so it really turned out to be closer to 80 little bite-size squares for my family.
We enjoyed having a bunch of bites of fudge to share between us. . . and I kept popping these little squares in my mouth all day. Cutting them into smaller squares also means there’s more to go around for gifts or for sharing at parties.
If you have more willpower around fudge than we did, it stores well in an air-tight container in the fridge for a few days.

Best Fudge Recipes
You can’t ever have too many fudge recipes, especially during the holidays.
White Chocolate Pretzel Fudge is a salty, sweet, and crunchy treat that I love including on candy and cookie platters to share with friends. Chocolate Covered Oreo Fudge was inspired by the fudge-covered Oreos that became popular a couple of years ago and we all found it so much better than anything from a box.
Peppermint Marshmallow Fudge practically sings with Christmas cheer. It’s the ultimate holiday fudge recipe but my kids enjoyed it so much that I can see myself making it anytime the craving hits even if it’s the middle of July!
For something a little different on your holiday baking list, how about trying this M&M White Chocolate Fudge or this Cookies and Cream Fudge? I think white chocolate and vanilla fudge varieties look so pretty, especially with bits of candy or cookies mixed in!
Kitchen tip: I use these bowls and this pan to make this recipe.
Buckeye Fudge Recipe
- Peanut Butter Layer – Combine the peanut butter, butter, and vanilla in a glass bowl and melt in the microwave for 90 seconds. Stir to combine, it should come together very quickly and be smooth and creamy.
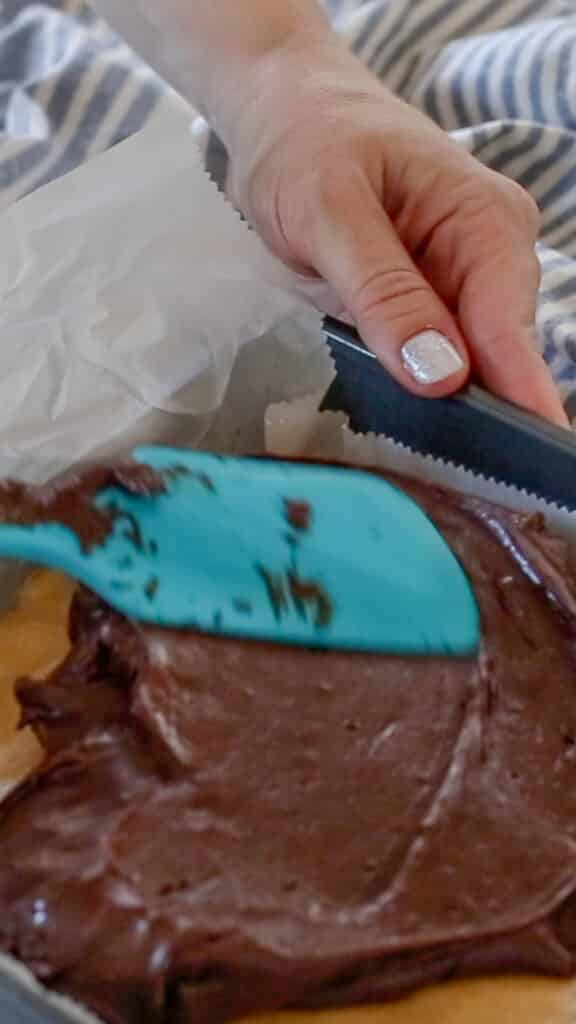
- Slowly add the powdered sugar a cup or so at a time. Stir to combine thoroughly. Grease an 8-9 inch pan with butter or line with parchment. Transfer the peanut butter fudge mixture to the pan and press into the pan.
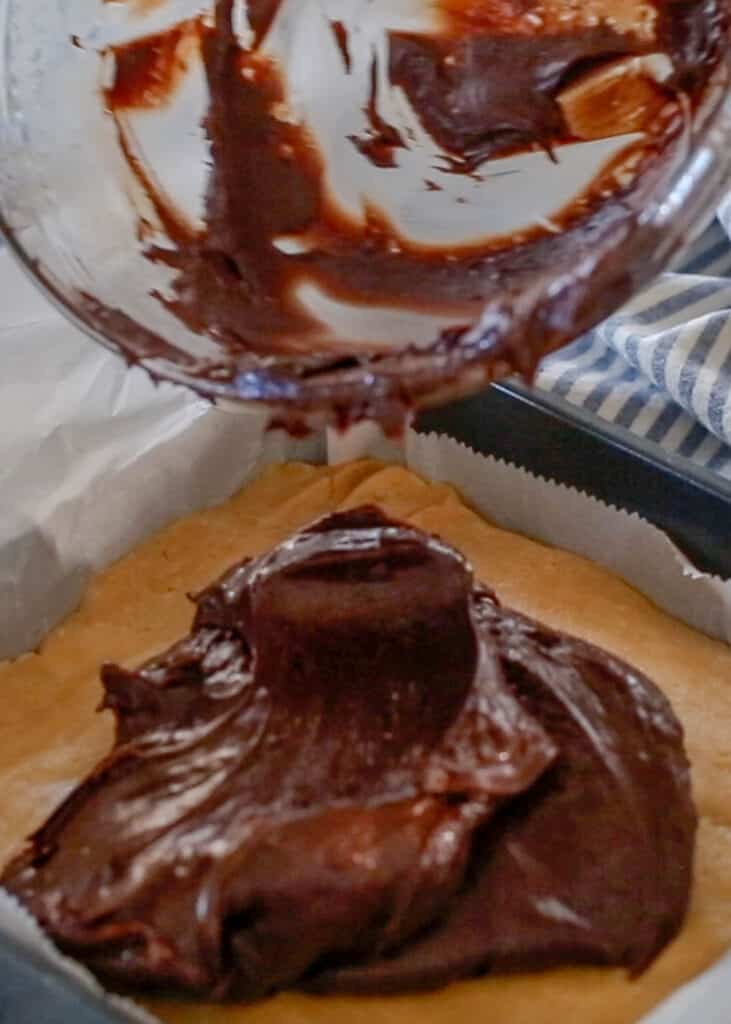
- Chocolate Layer – Combine the milk, the chocolate, and the butter in a medium-size glass bowl and heat in the microwave for 90 seconds. Stir to combine and heat another 15 seconds if needed. Stir until smooth. Pour over the peanut butter fudge.
- Let cool on the counter for at least 4 hours before cutting, or chill in the refrigerator. Slice into bite-size servings and store in an airtight container in the refrigerator for up to a week.
Fudge Making Tips
The fudge will set up at room temperature in a few hours. It is sliceable and perfect that way. Personally, I preferred mine cold and served it from the refrigerator.
I’ve listed the fudge as 48 servings. However, I like my bites sliced even smaller, (this fudge is rich!) so it really turned out to be closer to 80 little bite-size squares for my family.
I’ve found that the layers of fudge will sometimes separate if you attempt to slice it while it is super cold straight from the refrigerator. Set the fudge on the counter and let it warm at room temperature for a few minutes before slicing into bite-size pieces.
Homemade Candy
Homemade fudge and candy have saved me so much time (not to mention money) when it comes to Christmas gifts. Whether you give fudge on its own or as an accompaniment to another present, it means so much to share a treat you love with others.
This Buckeye Fudge recipe would also be a perfect gift any time of year, just to let someone know you were thinking of them. I know I’d smile extra wide if a friend or neighbor showed up at my door with a plate of fudge!
Looking for more homemade candies to add to your baking list? Check out Homemade Butter Mints and Chocolate Covered Candy Cane Marshmallows for more great ideas everyone is sure to love.

Buckeye Fudge
Ingredients
Peanut Butter Layer
- 1 cup butter
- 1 cup creamy peanut butter
- 1 teaspoon vanilla
- 3½ cups powdered sugar
Chocolate Layer
- 7 ounces sweetened condensed milk (1/2 of a 14 ounce can)
- 1½ cup dark or semi-sweet chocolate chips
- 2 tablespoons butter
Instructions
Microwave Directions
- Peanut Butter Layer – Combine the peanut butter, butter and vanilla in a glass bowl and melt in the microwave for 90 seconds. Stir to combine, it should come together very quickly and be smooth and creamy. Slowly add the powdered sugar a cup or so at a time. Stir to combine thoroughly. Grease an 8-9 inch pan with butter or line with parchment. Transfer the peanut butter fudge mixture to the pan and press into the pan.
- Chocolate Layer – Combine the milk, the chocolate and the butter in a medium size glass bowl and heat in the microwave for 90 seconds. Stir to combine and heat another 15 seconds if needed. Stir until smooth. Pour over the peanut butter fudge.
- Let cool on the counter for at least 4 hours before cutting, or chill in the refrigerator. Slice into bite size servings and store in an airtight container in the refrigerator for up to a week. Enjoy!
Stove Top Directions
- Peanut Butter Layer – Combine the peanut butter, butter and vanilla in a medium size saucepan over medium low heat. Stir to combine, it should come together very quickly and be smooth and creamy. Remove the pan from the heat and slowly add the powdered sugar a cup or so at a time. Stir to combine thoroughly.
- Chocolate Layer – Combine the milk, the chocolate and the butter in a medium size glass bowl over a simmering pan of water and allow it to slowly melt while stirring occasionally. Once it has fully melted, stir until smooth. Pour over the peanut butter fudge.
- Let cool on the counter for at least 4 hours before cutting, or chill in the refrigerator. Slice into bite size servings and store in an airtight container in the refrigerator for up to a week. Enjoy!
Video
Notes
Nutrition
Nutrition information is automatically calculated, so should only be used as an approximation.
{originally published 10/23/14 – recipe notes and photos updated 12/8/21}


This dessert was a nightmare.the top chocolate layer never set , way to loose …unable to cut. So I poured off the top layer after 12 hours of waiting for it to set I made a pure chocolate layer unfortunately this did not stick well to the fudge and although difficult to cut I was at least be able to salvage quite a bit of the fudge. I followed the recipe exactly not sure why this fudge covering was so bad
Hi, Diane. Sorry to hear that the fudge didn’t turn out well for you. Did you happen to substitute/omit any ingredients?
No I didn’t change any of the ingredients, although I did double the recipe.
The fudge was good the topping was a nightmare.
So I have attempted to make it again, this time only making it to the same specifications that you used. Yet the chocolate still seems to lose very hesitant to put it on top of the fudge.
Just made a double batch of this and it turned out amazing! I followed the recipe exactly and the fudge is perfect! Thank You!!
You are welcome, Michel. Enjoy!
I followed the recipe to a tee but the peanut layer was so greasy it wouldn’t spread just slid all over. I tried putting more powdered sugar it but still to oily. Is there something I could have done differently? I used a named brand peanut butter.
Sorry to hear that, Cory. Did you happen to substitute/modify the butter or vanilla when prepping the peanut butter?
I had a hard time with the fudge layer. I’m still waiting to see how it sets up, but I expected it to be a smooth, liquid that I could pour, but it was a thick, kinda sticky lump that I needed to press down over the peanut butter fudge to get it to spread out. It kept sticking to the spoon. Not sure what I did wrong but I did notice that the condensed milk was pretty thick when I opened the can.
As pictured above and illustrated in the video, the chocolate layer should’ve been pretty thick but pourable. It sounds like the measurement for one of the ingredients might have been a little off. Hopefully it still set up nicely for you, Christina!
I line my pans with parchment paper leaving some hang over the edge, so you can lift out of the pan and easily slice. If you use a silicone spatula to spread the layers, it won’t stick. Then use a piece of plastic wrap to smooth it all down with your hands. Makes sure it’s still really warm for best results. Another tip is to score the peanut butter layer lightly so the chocolate doesn’t separate away from the peanut butter layer once it’s set and ready to slice. Perfect every time.
This was the best buckeye fudge I’ve ever made ❣️ The peanut butter later was perfect, not too dry like some others I tried. My mom used to do the buckeye balls but this is SOOOO much simpler and doesn’t have wax or coconut oil in it LOVED 😍🥰
I’m thrilled it’s a hit!
For some reason the top chocolate layer was like 1/3 the amount of the peanut butter, and it was too set to spread. Please help! I was going to make this as Christmas present and I don’t know what to do…
Hello! You may not have heated the chocolate part for long enough, but beyond that I’m not sure what might have happened.
If you look at the photos of her finished product the chocolate layer is not as thick as the peanut butter layer. This is how mine is as well. It’s not supposed to be half and half. It sounds like the chocolate layer maybe needed to be heated longer. The chocolate will have to be spread once you pour it out. It’s not super thick, but it’s not liquidy. Hope that helps!
Could you have overheated it? Sometimes if you overheat chocolate it will seize up and lose its glossiness making it hard to spread.
Perfection. Followed recipe exactly and watched the video. Just perfect and easy!! I made them last year and cooled in fridge instead of countertop and the top layer did separate from the bottom layer, but this year I cooled on the counter overnight. Cut them this morning and the two layers are melded together perfectly! So, I definitely don’t recommend cooling in the fridge. it’s also important to use an 8 inch square pan to get the right thickness. Thanks for the great recipe!
I’m thrilled that the fudge is a hit, Steph!
I followed this recipe, exactly, except, for I added the vanilla at the end of the cook cycle in the microwave. Used milk chocolate chips. Adam’s peanut butter. I am leaving it at room temperature to set and then I’m going to put it in the refrigerator in the morning. I stole a little piece off the side. It looks beautiful. It taste great to cut reminds me of a fast break candy bar.
I’m so glad it’s a hit, Carla!
I made 2 batches of this for Christmas. It was easy & perfect!
Happy to hear that the fudge was a hit, Kimberly.
So easy to make and it was delicious ❤️
I’m glad the fudge was a hit, Vickie.
My favorite go to fudge I’ve been making it a couple years now! Works every time!! My family and friends LOVE it so much 🩷
I’m so glad you like it!
This fudge is my absolute favorite. I’ve been making it for years and it never gets old. The absolute best!! Thank you for sharing.
I’m thrilled that you’re enjoying it!
Could chunky peanut butter be used?
You can do that, but it will likely make the fudge more difficult to slice cleanly.
I normally do well this kinda stuff but my chocolate layer isn’t getting hardy, any recommendations on how to fix that.. it’s been in fridge for 3 hours and barely thickened
Without being in your kitchen with you, it’s hard to guess what might have gone wrong. Hopefully it firmed up overnight. Did you by chance substitute an ingredient or change anything in the method shown?
I adore this recipe, it’s absolutely delicious! Fast, easy, and always receives rave reviews! I saw the comment regarding the topping, so I weighed 7oz of the sweetened, condensed milk rather than eyeballing it just to make sure my measurements were correct and it turned out great; I will say, placing the fudge in the refrigerator really helps set up much more quickly.
I’m so glad you like it!
Can this be made with a 9×13 pan using the 1x recipe?
You’ll want to double the recipe for a 9×13 pan.
I used dark chocolate chips this time and I will say that it makes the chocolate layer slightly different. More glossy than the milk chocolate. Still easy to spread but harder to tell when it is set.
I’m glad you like the fudge, Stephanie.
When doubling or tripling this recipe what pan sizes should I use? Thank you!
This should work well in a 9×13 pan when doubled, Jeanine.
Amazing great everytime made many times
I’m glad it’s a favorite!
What brand
of chocolate did you use and what brand of peanut butter?
I typically use the giant bag of Costco chocolate chips (pretty sure it’s Nestle brand most of the time). And Jif peanut butter is my brand most of the time.