This post may contain affiliate links. Please read our disclosure policy.
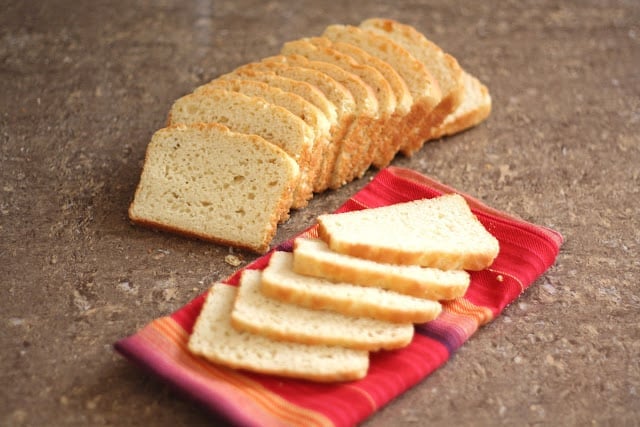
This is a soft and fluffy gluten free sandwich bread that tastes great and can be sliced incredibly thin.
I have never sliced a loaf of homemade bread this thinly. I average about 2-3 slices for every inch of this bread. An 8 1/2″ loaf pan usually results in about 20 slices.
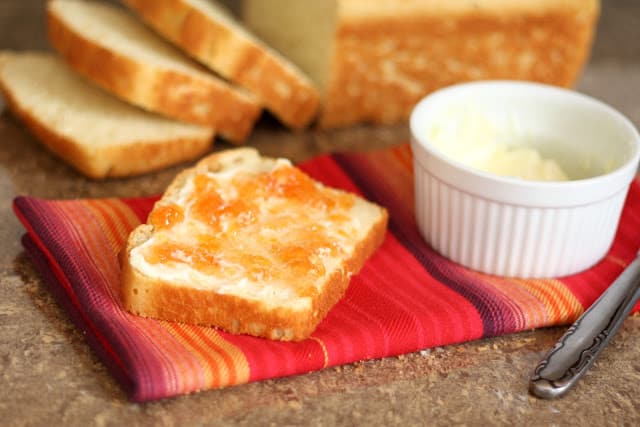
Sliced thick and thin, we’ve been eating this bread with breakfast, lunch, dinner or even as dessert a few times. With homemade peach jam, it is a treat that the whole family enjoys.
Gluten Free Sandwich Bread
I’ve played with this recipe for a while now and it produces a very dependable loaf of bread. Two things to note here: first, measure the ingredients carefully.
Scoop the flours into the measuring cups with a spoon and then level off the flour with the back of a knife. Also, when pouring the dough into the pan for the final rise, make sure to press down enough to remove any air bubbles.

Trapped air bubbles = a hole in the center of the bread. The air pocket won’t cause it to bake differently and it won’t affect the taste, but it will make for an odd sandwich.
This method is proven and I am beyond thrilled with the results. I’m including a lot more pictures than usual with this post because I have had numerous questions about this bread.
This is a bread recipe that anyone should be able to bake. The pictures will hopefully help provide visuals that a novice can follow.
Gluten Free Bread Recipes
Honey and Oat Gluten Free Bread is a favorite in my house for morning toast and for sandwiches as well.
For a couple of quick bread options, this Sour Cream Banana Bread and these Chocolate Chip Pumpkin Muffins get made on repeat.
Gluten Free Sandwich Bread Recipe
Once you’ve added all the ingredients, beat the mixture at high speed for 3 minutes.
This adds air to the thick batter, which helps take the place of the missing gluten as far as structure is concerned. It will create a much fluffier loaf of bread, similar to store-bought varieties.
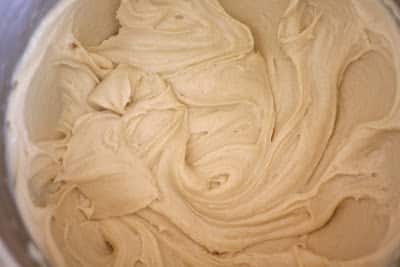
At the end of 3 minutes, the batter will look like thick, heavy buttercream icing: smooth and silky. It should not look at all like a typical yeast dough.
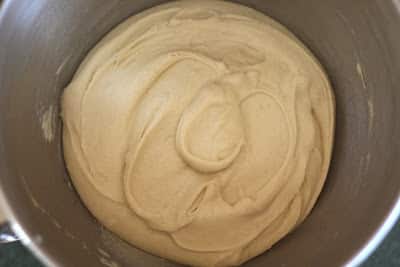
The dough will be very sticky, and feel a bit gritty if you rub some between your fingers. Scrape the sides of the mixing bowl and leave the batter right in the bowl to rise for the first time.
Cover the bowl with a light towel or loose plastic wrap and let the thick batter rise for 90 minutes. This batter might not completely double in size, but it will puff up considerably.
Lightly grease an 8 1/2” x 4 1/2” loaf pan with butter. Gently stir the batter down. Scrape it into the prepared pan. The dough should still be wet and not at all knead-able. It reminds me of a very thick brownie batter at this stage.
Using dampened fingers, or a wet spatula or bowl scraper; smooth the top, eliminating as many wrinkles, bubbles or creases as possible. The smoother your loaf is before this final rise, the smoother it will be once it’s baked.
After the dough rises and bakes, the top of the loaf will look very much the same as it looks when you finish smoothing it out. It is worth a minute or two of effort to make it as smooth as possible now.

Loosely cover the pan with a towel (or a lightly greased piece of plastic wrap) and let the dough rise until it barely crowns over the rim of the pan.
This will take 45 – 60 minutes, or possibly as much as 90 minutes, depending on the temperature of your kitchen. Towards the end of the rising time, preheat the oven to 350°F.
This dough is fairly delicate. Try not to touch it again at all. Any finger touch or bump will be visible after the bread is baked.
Kitchen Tip: I use this mixer, this scraper, and this loaf pan to make this recipe.

Tender High Rising Gluten Free Sandwich Bread
Ingredients
- 2 cups brown rice flour
- ⅔ cup potato starch this is NOT the same as potato flour
- ⅓ cup tapioca starch
- 3 tablespoons sugar
- 2 teaspoons instant yeast
- 1¼ teaspoons kosher salt
- 1¼ teaspoons xanthan gum
- 1 cup warm milk
- ¼ cup butter softened to room temperature
- 3 large eggs
Instructions
- Combine all of the dry ingredients in a mixing bowl, or the bowl of your stand mixer. I’ve made this using both the KitchenAid and a hand mixer. Both methods work well, admittedly the stand mixer is much easier.
- While using an electric mixer (hand mixer, or stand), slowly pour in the warm milk. The mixture will be mostly crumbs at first, but once all the milk is added, it will begin to come together. Add 4 tablespoons of softened butter and beat until thoroughly blended.
- Add the eggs, one at a time. Beat the mixture after each egg is added, until it is thoroughly integrated before adding the next one. Once you’ve added all the eggs, beat the mixture at high speed for 3 minutes. This adds air to the thick batter, which helps take the place of the missing gluten as far as structure is concerned. It will create a much fluffier loaf of bread, similar to store bought varieties.
- At the end of 3 minutes, the batter will look like thick, heavy buttercream icing: smooth and silky. It should not look at all like a typical yeast dough. The dough will be very sticky, and feel a bit gritty if you rub some between your fingers. Scrape the sides of the mixing bowl and leave the batter right in the bowl to rise for the first time.
- Cover the bowl with a light towel or loose plastic wrap and let the thick batter rise for 90 minutes. This batter might not completely double in size, but it will puff up considerably.
- Lightly grease a 8 1/2” x 4 1/2” loaf pan with butter. Gently stir the batter down. Scrape it into the prepared pan. The dough should still be wet and not at all knead-able. It reminds me of a very thick brownie batter at this stage. Using dampened fingers, or a wet spatula or bowl scraper; smooth the top, eliminating as many wrinkles, bubbles or creases as possible. The smoother your loaf is before this final rise, the smoother it will be once it’s baked. After the dough rises and bakes, the top of the loaf will look very much the same as it looks when you finish smoothing it out. It is worth a minute or two of effort to make it as smooth as possible now.
- Loosely cover the pan with a towel (or a lightly greased piece of plastic wrap) and let the dough rise until it barely crowns over the rim of the pan. This will take 45 – 60 minutes, or possibly as much as 90 minutes, depending on the temperature of your kitchen. Towards the end of the rising time, preheat the oven to 350°F.
- This dough is fairly delicate. Try not to touch it again at all. Any finger touch or bump will be visible after the bread is baked.
- Bake the bread for 25 minutes, until golden brown. Remove it from the oven, and using hotpads for both hands, immediately turn it out of the pan onto a rack. Brush with a very small amount of melted butter to help keep the crust soft, and add flavor. Slice when completely cool. Enjoy!


Hello, Mary,
I found this recipe in February and have made it several times (3, now).
The first few times, my husband and I feel it came out more like cornbread and fell apart after a day or so, but yesterday I made it again (with a mistake of 2 Tbsp yeast instead of 2 tsp -Fleishman's active dry) and it came out fluffier and almost tasting more like "real" bread (read 'wheat' bread – something my husband hasn't been able to eat for over a year since diagnosed with Gluten intolerance).
I used my KitchenAid mixer with a ceramic attachment that looks like a top with 4 holes (not sure the proper name) and this does a great job. (addressing crackurjax, Feb 19)
I also used my bread maker which we got as a Christmas present – it's a Breville – for all the other steps after mixing (rising, beating down, rising and baking). It's got a Gluten Free setting and I can modify the settings do the rest of the work. (addressing Anon- Oct 26, Jan 6 and Gail – Jan 31)
I set it to rise at 120 degrees for the rising and punch down for 15 seconds between rising times. The top still isn't rounded like your final picture, but I'm determined not to give up because my husband and I are raving fans!
Thank you!
I use Earth Balance buttery spread and rice milk to make it dairy free, and it is delicious! I'm planning to experiment with flax egg replacer to make it vegan; I'll keep you posted on how it turns out.
I have made this bread for my family continuously since January of this year, and it is delicious and comes out great every time! I've actually had people offer to pay me to make them a loaf! I make it dairy free by using rice milk and earth balance organic buttery spread, and I'm planning to try using flax egg replacer to make it vegan.
Would adding some honey work for this bread or wreck it? If you think it could work, how much would you recommend adding?
Thank you 🙂
This bread us by far the best gf I have ever made or eaten. You have a master piece here! Thank you a so much for sharing! Next time I'm going to make it into rolls!
Made this bread for the third time today. Still working on tweaking the cook time/temperature. Unfortunately, this time I let the dough rise too long and it overflowed the pan – wouldn't come out of my greased non-stick pan very easily because of it.
I love hummus and have been using chips to dip but for me the best way to eat hummus is with pita bread. When I made plans to bake my third loaf, I decided I would try it with hummus. The bread hasn't cooled enough for me to slice it yet but I used some of the bread that clung to the loaf pan to dip in the hummus. WONDERFUL!!!!!!!!
I've found that the cooking time and the temp has to be adjusted for the time of year AND the climate. I have considered updating the recipe with what I do in the summer and how it changes in the winter, but I imagine that would be different in different parts of the country too. Let me know what works best for you, that way others will benefit from your experience as well! I'm glad you love the bread though!
Just wanted to say THANKS! This recipe is AWESOME! I've been baking gf bread for about 3 years now and have only made a couple recipes more than once. I'm sure I'll continue to make this one as the loaf is just perfect, not gummy or hole-y, or stiff & crumbly. Even day 2! I froze half the loaf (to test & I'm not a big bread Eater) so that's the final part for me.
I did use 2/3c sorghum for part of the rice flour. Other than that I followed the recipe.
Oh I forgot till I was reading a comment above, I used 2 Tbs honey instead of sugar
& my loaf was great!
Your loaf looks so beautiful. I came to your site looking for haupia and saw your link for tender gluten free bread. I have not had much luck with gluten free bread recipes since being diagnosed with a wheat allergy. I was about to give up on good tender gluten free bread but your pictures have inspired me to try once again. I do have one question do you use the Bob Red mills type rice flour or do you use the superfine type like Authentic foods? I can only find BRM locally and am debating buying Authentic foods online it's expensive for my budget and most of my breads recipes have not be worth the extra expense but again your bread looks wonderful and worth the expense if necessary.
For bread baking, I use BRM rice flours almost exclusively. I have only tried the superfine flours a few times and when I use them, it is clearly noted in the recipes. I hope that helps!
Hi Mary, I love this recipe but can u replace the yeast with something else? N tapioca n can't hum gum? My son is allergic to all of it
Hi Mary, just to let u know my problem, I'm new to bakings n yet doesn't know how the chemistry works. I bought a premix gf bread n it comes out glooey n sink in the middle n no air bubble after baked. It rise when it was fresh from oven but sink when it's cooled. And I did use yeast but my son can't tolerate yeast. I'm so confuse n lost but still don't want to give up on baking for my son cos he loves bread so much. Pls help me😞
Hi Fantacia,
It sounds like this is not a recipe that will work well for you. The yeast is required. Have you tried any simple quick breads? If you'd like to email me, I would be happy to see if I can find some recipes for you to try.
Mary
mary (at) barefeetinthekitchen (dot) com
I noticed this recipe doesn't call for cider vinegar. This is not a misprint is it
This recipe does not need vinegar as it is written.
I need some help cause I don't own a stand mixer or a hand mixer. All I have is my hands. I can barely feed us as it is with being diagnosed with celiac; my daughter and I. Things are so expensive to buy that has to be gluten free and with no job or money I have to be frugal, So can I make this by hand.
I do not think you will have a good result without a mixer. The gluten free flours and starches require the extended mixing time. Normally, I would say that most recipes are worth a try without the mixer, but these flours are not inexpensive. I would hate to have you waste the ingredients and have it not turn out. I suspect that the bread would be very very dense and hard without a mixer to whip air into it.
If you can try to get a hold of a whisk or large fork. I was able to beat this by hand no problems with just a whisk, it was exhausting but the bread turned out fine.
First off, thanks. Best tasting GF bread I've made to date. I've made this a few times now, first time I did not get the required rise, due to room temp. Second and subsequent times did get great rise, good bake, nice colour, but it always seems to break or crumble when I turn it out. What am I doing wrong?
The room temp will definitely affect the rise, as you discovered. I'm not sure why it is crumbling though. Are you turning the bread out while still warm and then allowing the bread to cool completely, before slicing it? Not sure why it is crumbling on you. That is always frustrating.
I am turning it out right away, and quite gently (like rack over the pan and flip) but still always end up with two or three big pieces. I'm going to try a different pan, maybe a glass one, and also play with my time/temps.
Let me know what you figure out, Brian. That is odd that it's breaking for you. I have never had that happen. Is it sticking to the pan maybe?
What are the characteristics imparted by potato starch and tapioca starch, and why do you use both together in the recipe?
The potato starch adds a lightness to the bread and the tapioca starch adds a bit more "chew." I find that for most bread recipes they work very nicely together.
Thanks for replying. So basically the potato starch is creating more carbon dioxide and expanding the batter, whereas the tapioca is holding it all together with a flexible bond?
As I understand it, potato starch and potato flour are very different and are not really interchangeable.
What about tapioca starch versus tapioca flour? Are they interchangeable or not What's the difference between those?
I've never used tapioca flour, so I can't say. I have used potato flour and it is much heavier with a stronger "potato" flavor as well. Good luck with the baking!
The store was out of Glutino Bread mix two weeks in a row, so I made this bread last night. Only thing I substituted was 2tsp guar gum for the Xantham Gum and only had 40 mins for the first rise. It came out perfect. Just like the picture. Made French toast for my son this morning and a sandwich for lunch. Thank you so much for this great recipe!!
This has the best flavour of all the recipes I've tried so far, but it just didn't rise for me like in your pictures. My yeast is good, and the only subs made were honey/agave for sugar and corn and tapioca starch instead of potato- which I had seen in the comments with success. I'll definitely try it again and again, though! I just wish I could figure out how to get a taller, lighter loaf. :/
Hi Ley,
I think the honey might have affected it slightly. However, I've played with a honey and oat combination that works really well and tastes a little bit more like traditional wheat breads. Here's the link if you would like to check it out. I'm so glad you like the flavor!
https://barefeetinthekitchen.com/2012/10/honey-and-oat-gluten-free-bread.html
Happy baking!
Could you use ener-g egg replacer instead of eggs. My family is vegan and gluten free. this looks really good by the way
I've never tried it myself, but I've heard that it worked well for other people. If you try it, let me know how it does!
Wonderful loaf of bread! I don't have a good hand mixer so lately I have been putting it in my bread machine according to directions, and running the dough cycle. Mine takes 90 minutes. Then I "punch" it down with a spoon and pour it into a greased bread pan. I let it rise about 20 minutes and then bake. It comes out perfect and light and is one of the very best GF recipes! I have been letting the bread machine mix most of my GF breads and have better consistency with the recipes. Try this one if you haven't yet!
Hello.
I made this bread yesterday, and it was the first bread I've made that smelled like bread while baking. The only problem was that it was a bit gummy and it was also very holy (lots of holes) and had a fairly large pocket of air in the middle. I was wondering how I could fix this problem for next time.
The gumminess might have been due to removing it from the oven before it had finished baking completely. I'd add an additional 5-10 minutes to your time next time. The holes are unusual for this recipe. I'm unsure what might have caused that to happen.