This post may contain affiliate links. Please read our disclosure policy.
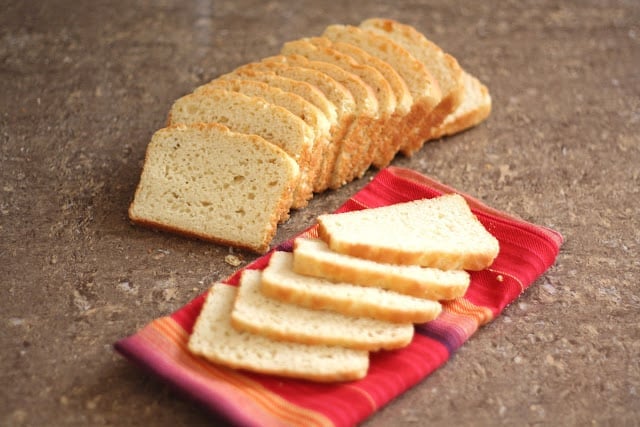
This is a soft and fluffy gluten free sandwich bread that tastes great and can be sliced incredibly thin.
I have never sliced a loaf of homemade bread this thinly. I average about 2-3 slices for every inch of this bread. An 8 1/2″ loaf pan usually results in about 20 slices.
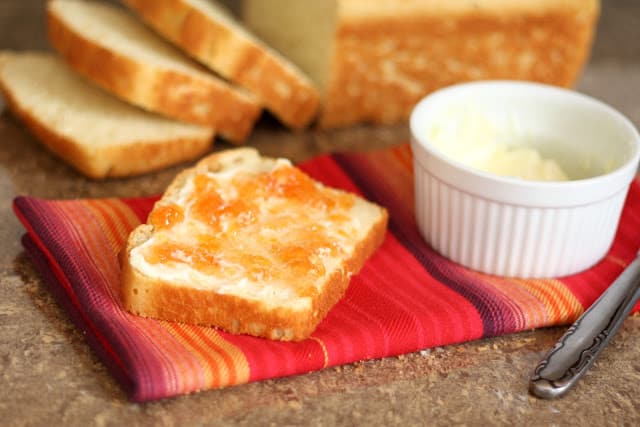
Sliced thick and thin, we’ve been eating this bread with breakfast, lunch, dinner or even as dessert a few times. With homemade peach jam, it is a treat that the whole family enjoys.
Gluten Free Sandwich Bread
I’ve played with this recipe for a while now and it produces a very dependable loaf of bread. Two things to note here: first, measure the ingredients carefully.
Scoop the flours into the measuring cups with a spoon and then level off the flour with the back of a knife. Also, when pouring the dough into the pan for the final rise, make sure to press down enough to remove any air bubbles.

Trapped air bubbles = a hole in the center of the bread. The air pocket won’t cause it to bake differently and it won’t affect the taste, but it will make for an odd sandwich.
This method is proven and I am beyond thrilled with the results. I’m including a lot more pictures than usual with this post because I have had numerous questions about this bread.
This is a bread recipe that anyone should be able to bake. The pictures will hopefully help provide visuals that a novice can follow.
Gluten Free Bread Recipes
Honey and Oat Gluten Free Bread is a favorite in my house for morning toast and for sandwiches as well.
For a couple of quick bread options, this Sour Cream Banana Bread and these Chocolate Chip Pumpkin Muffins get made on repeat.
Gluten Free Sandwich Bread Recipe
Once you’ve added all the ingredients, beat the mixture at high speed for 3 minutes.
This adds air to the thick batter, which helps take the place of the missing gluten as far as structure is concerned. It will create a much fluffier loaf of bread, similar to store-bought varieties.
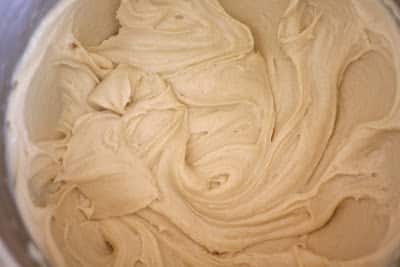
At the end of 3 minutes, the batter will look like thick, heavy buttercream icing: smooth and silky. It should not look at all like a typical yeast dough.
The dough will be very sticky, and feel a bit gritty if you rub some between your fingers. Scrape the sides of the mixing bowl and leave the batter right in the bowl to rise for the first time.
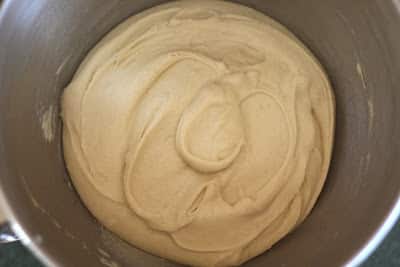
Cover the bowl with a light towel or loose plastic wrap and let the thick batter rise for 90 minutes. This batter might not completely double in size, but it will puff up considerably.
Lightly grease an 8 1/2” x 4 1/2” loaf pan with butter. Gently stir the batter down. Scrape it into the prepared pan. The dough should still be wet and not at all knead-able. It reminds me of a very thick brownie batter at this stage.
Using dampened fingers, or a wet spatula or bowl scraper; smooth the top, eliminating as many wrinkles, bubbles or creases as possible. The smoother your loaf is before this final rise, the smoother it will be once it’s baked.
After the dough rises and bakes, the top of the loaf will look very much the same as it looks when you finish smoothing it out. It is worth a minute or two of effort to make it as smooth as possible now.

Loosely cover the pan with a towel (or a lightly greased piece of plastic wrap) and let the dough rise until it barely crowns over the rim of the pan.
This will take 45 – 60 minutes, or possibly as much as 90 minutes, depending on the temperature of your kitchen. Towards the end of the rising time, preheat the oven to 350°F.
This dough is fairly delicate. Try not to touch it again at all. Any finger touch or bump will be visible after the bread is baked.
Kitchen Tip: I use this mixer, this scraper, and this loaf pan to make this recipe.

Tender High Rising Gluten Free Sandwich Bread
Ingredients
- 2 cups brown rice flour
- ⅔ cup potato starch this is NOT the same as potato flour
- ⅓ cup tapioca starch
- 3 tablespoons sugar
- 2 teaspoons instant yeast
- 1¼ teaspoons kosher salt
- 1¼ teaspoons xanthan gum
- 1 cup warm milk
- ¼ cup butter softened to room temperature
- 3 large eggs
Instructions
- Combine all of the dry ingredients in a mixing bowl, or the bowl of your stand mixer. I’ve made this using both the KitchenAid and a hand mixer. Both methods work well, admittedly the stand mixer is much easier.
- While using an electric mixer (hand mixer, or stand), slowly pour in the warm milk. The mixture will be mostly crumbs at first, but once all the milk is added, it will begin to come together. Add 4 tablespoons of softened butter and beat until thoroughly blended.
- Add the eggs, one at a time. Beat the mixture after each egg is added, until it is thoroughly integrated before adding the next one. Once you’ve added all the eggs, beat the mixture at high speed for 3 minutes. This adds air to the thick batter, which helps take the place of the missing gluten as far as structure is concerned. It will create a much fluffier loaf of bread, similar to store bought varieties.
- At the end of 3 minutes, the batter will look like thick, heavy buttercream icing: smooth and silky. It should not look at all like a typical yeast dough. The dough will be very sticky, and feel a bit gritty if you rub some between your fingers. Scrape the sides of the mixing bowl and leave the batter right in the bowl to rise for the first time.
- Cover the bowl with a light towel or loose plastic wrap and let the thick batter rise for 90 minutes. This batter might not completely double in size, but it will puff up considerably.
- Lightly grease a 8 1/2” x 4 1/2” loaf pan with butter. Gently stir the batter down. Scrape it into the prepared pan. The dough should still be wet and not at all knead-able. It reminds me of a very thick brownie batter at this stage. Using dampened fingers, or a wet spatula or bowl scraper; smooth the top, eliminating as many wrinkles, bubbles or creases as possible. The smoother your loaf is before this final rise, the smoother it will be once it’s baked. After the dough rises and bakes, the top of the loaf will look very much the same as it looks when you finish smoothing it out. It is worth a minute or two of effort to make it as smooth as possible now.
- Loosely cover the pan with a towel (or a lightly greased piece of plastic wrap) and let the dough rise until it barely crowns over the rim of the pan. This will take 45 – 60 minutes, or possibly as much as 90 minutes, depending on the temperature of your kitchen. Towards the end of the rising time, preheat the oven to 350°F.
- This dough is fairly delicate. Try not to touch it again at all. Any finger touch or bump will be visible after the bread is baked.
- Bake the bread for 25 minutes, until golden brown. Remove it from the oven, and using hotpads for both hands, immediately turn it out of the pan onto a rack. Brush with a very small amount of melted butter to help keep the crust soft, and add flavor. Slice when completely cool. Enjoy!


Thank you for this recipe. After reading some of the reviews I subbed 1c of the rice flour for sorghum flour, coconut milk and used 2 TBspn honey for the sugar. As I didn't have quick yeast I used active yeast that I let activate in the warm coconut milk whitch had the honey stirred into it as would do making wheat bread. I did have to add a little extra milk to get the right consistency. I used electric egg beaters. The loaf has come out fantastic.
This is my 7th time making this bread recipe and I love it but I am trying to get mine to raise like yours. I used extra large eggs and organic whole husk psyllium flakes instead of the gums. I doubled the amount. Your seams to be thicker then mine. After the first rise it is very loose and airy. I just made a double batch today for my stuffing on Thanksgiving Day. Any suggestions would be great 🙂
Hi Lisa, The only differences I see are that I usually use large eggs versus extra large eggs and I've never tried using the psyllium flakes. I don't think that either of those things should prevent the rise though. It's possible that the temperature in the house could be affecting it. It's hard to guess without being in your kitchen. Breads are temperamental at times and GF ones tend to be even more so. I'm thrilled that you love the bread though!
Mary, thank you for this recipe. I cooked it last night and just had to make myself not eat the whole loaf. I had to sub the dairy items, but it still came out great. It's a keeper! Thanks!
I followed the instructions exactly, the only difference being I used white rice flour and almond milk. Every single time, it looked exactly like the picture. Baked it, it came out looking like a magazine. It was gorgeous! Tried the first slice — so lovely! Second slice, just as wonderful. Called the husband to brag about FINALLY finding an easy GF bread recipe. Third slice, flawless! Fourth slice, stupendous!
Fifth slice…
…ugh oh.
Completely raw and hallow for the middle of the loaf. I was able to save the first and third of it, but the middle third was totally raw and undercooked. I'm guessing it's my oven — if she was a person, she'd be the Crazy Cat Lady from The Simpsons.
Will try again — hopefully without the maddening wastefulness of a dream of a loaf of bread. <3
My best guess is a problem with the oven. I'd try adding a few minutes to the baking time and then test with a toothpick next time, just to make sure the center of the loaf is cooked through.
I have been making your bread recipe for 3 1/2 months and I can not seem to get the batter to rise like your. I follow the recipe to a tee but it does not come out as thick as yours. I made it today and I had to increase the brown rice flour to the batter to thicken it up. I sub the gun with organic psyllium flakes and that would not make a dif. I am stumped. I am going to decrease the milk next time and see if this make a dif. I live in South Florida so my rising time is not as long it is much less.I make this bread for stuffing, bread crumbs and sandwiches.
The bread is in the oven now I double the recipe and one loaf id going over in the oven. I will perfect this one way or another!
Merry Christmas
Is it possible that your pans are slightly larger, Lisa? My favorite bread pans are very narrow and kind of small (just 4"x8") and when I use my 5"x9" pan it doesn't rise nearly as tall. I'm glad you like the recipe! Hopefully it will turn out perfectly for you very soon. Merry Christmas to you too!!
Thank you so much for this recipe. My daughter was diagnosed with Celiac in December and it's been a challenge to find bread that's not horrible. I tried to make my own and it was very dense and heavy. I tried your recipe today and found success! I actually forgot to initially add surgar and added it again after beating it for 3 minutes, but it still worked out great. The bread was very moist and light. Thank you!
THANK YOU!!! I've tried hordes of other recipes before this and they all flopped. This bread came out perfectly the first time.. but it looked so good we didn't wait for it to cool down, we just ate it warm. Thank you, it is such a pain driving an hour to the only health shop in my area every time we need wheat-free bread
Thanks so much for your gluten free sandwich bread recipe! I found it several days ago and just tried it today. It is just the very best gluten free bread I have ever tried! We have been gluten free for 2 years and have been using a flax gluten free bread recipe. This is the closest to regular bread I have ever had. I make bread once a week and this will be my new recipe. It actually does slice thin. I was not so sure that would be true. Hubby loves it too! That is 1 good thing about the internet. You can find recipes that were posted long ago. Found you through Pinterest and another recipe. Thank you!
I really appreciate you posting this! I've just gotten into gluten free baking- and this was absolutely delicious. I made it FODMAP friendly by substituting coconut oil for the butter, Bob's 1 to 1 all purpose mix( only because that's what I had), almond milk, and 3/4 c egg whites for the eggs. My next step is to go to the store to get the flours for your mix, because we ate the whole loaf! Thank you SO much!
I have tried so many bread recipes and all but 2 were a huge disappointment. I used your recipe yesterday, with fingers crossed. I followed your directions to a T (almost)…I used superfine brown rice flour and I baked it for 30 minutes because it wasn't quite brown enough at 25. It came out of the oven looking beautiful and it stayed that way. When it was cool, I cut into it and was very pleased with how easy it was to slice. No crumbling, no sticky dough on my knife…and then I took my first bite and realized I had finally found the perfect recipe for the perfect loaf of bread.
Thank you very much for sharing this recipe . I'm thrilled that I no longer have to continue my search for a delicious loaf of bread.

I baked it according to the recipe but the batter was way too much for the 8X4 pan. I ended up using a 9X5 pan. It tasted great and, for a GF bread the texture was good too, if a bit crumbly. HOWEVER, there was a big hole in the middle, like a tunnel. Could it be too much yeast? Or maybe I need to bake with a cooler oven? Help please! breadmantalking@gmail.com
I had the right amount of batter for my pan but I also had the huge hole in the middle. About half the batter did not cook through and was laying, raw, on the bottom of my bread tunnel. The tunnel of cooked bread is only about an inch thick, or 2 inches in some parts. Just a huge hole through the middle.
It was against my better judgement that I didn’t check the bread temp, because I didn’t know what it was supposed to be. If I had checked it would have been obvious that the bread was undercooked.
My oven temp is accurate, I don’t have issues with other recipes in it, and I cooked time according to the directions. The batter nearly doubled in size before it went in the oven – it seemed to rise well.
I’m so sorry that it didn’t cook through for you, Chrissi. I always test the bread before removing it. I aim for 190-200 degrees. (I’ll add a note to the recipe!)
Thank you for a recipe that doesn’t make me have to make a flour blend mix that I will have to use up.. especiLlly if I am not enamoured with the results and have a bunch left over…..
I’m happy to hear that it is helpful for you! (and I feel the same way about making and trying new flour blends!)
Best GF- free bread recipe I’ve come across yet! Really flavorful! And not overly crumbly. I will say make sure you grease the loaf pan fairly well – my first attempt stuck because I didnt do this. But otherwise great recipe!!!
I need to substitute both the milk and butter with something non dairy.
Suggestions?
I made the following modifications, and it turned out even better:
Replace 3 tablespoons sugar for 3 Tablespoons of Agave Syrup
Replace 1/4 cup butter softened to room temperature FOR 3 Tablespoons of Coconut oil.
You can also use a few drops of Coconut oil instead of butter to grease the pan.
Enjoy!
I baked a loaf of your GF bread just yesterday that called for some oat flour and honey. It was a lot like this one.
It turned out so good that I posted it on fb. Now everyone wants it but I can’t find it. 🙁
Here’s the link: https://barefeetinthekitchen.com/honey-and-oat-gluten-free-bread/ I’m thrilled that you like the recipe!
We recently found out my daughter has allergies to whole wheat and also eggs. Could this recipe be made substituting the eggs for unsweetened applesauce?
Unfortunately, eggs and applesauce will not react the same way in baked goods. I haven’t tried it myself, but many people have had success substituting flax eggs in bread recipes here. I hope that helps!
Where would you find potato starch and the gum?
I buy them at Kroger, WalMart, or on Amazon.
Thank you for sharing healthy recipes.
I haven’t tried the recipe yet. You give the size of the pan as 8 1/2 x 4 1/2. A standard loaf pans is 9 1/2 x 5 1/2. But the bottom measure 8 1/2 x 4 1/2. Is that the measurement you are using.\
Yes, that pan will work fine. Mine are slightly smaller with straighter sides.