This post may contain affiliate links. Please read our disclosure policy.
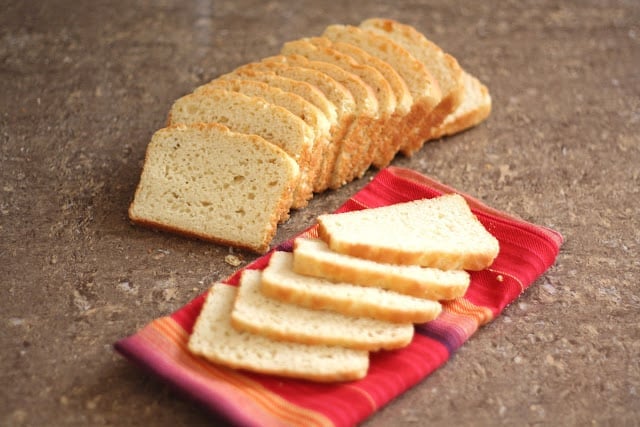
This is a soft and fluffy gluten free sandwich bread that tastes great and can be sliced incredibly thin.
I have never sliced a loaf of homemade bread this thinly. I average about 2-3 slices for every inch of this bread. An 8 1/2″ loaf pan usually results in about 20 slices.
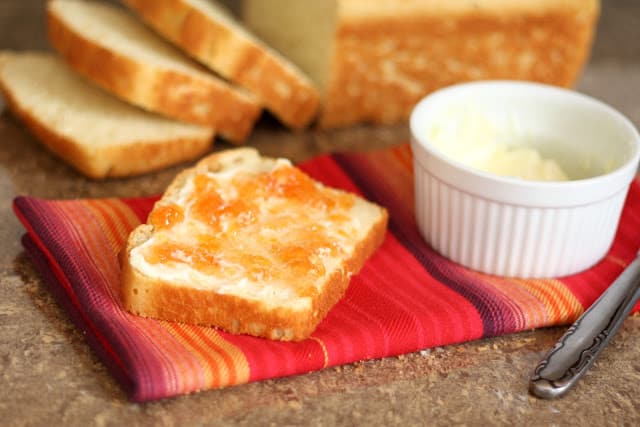
Sliced thick and thin, we’ve been eating this bread with breakfast, lunch, dinner or even as dessert a few times. With homemade peach jam, it is a treat that the whole family enjoys.
Gluten Free Sandwich Bread
I’ve played with this recipe for a while now and it produces a very dependable loaf of bread. Two things to note here: first, measure the ingredients carefully.
Scoop the flours into the measuring cups with a spoon and then level off the flour with the back of a knife. Also, when pouring the dough into the pan for the final rise, make sure to press down enough to remove any air bubbles.

Trapped air bubbles = a hole in the center of the bread. The air pocket won’t cause it to bake differently and it won’t affect the taste, but it will make for an odd sandwich.
This method is proven and I am beyond thrilled with the results. I’m including a lot more pictures than usual with this post because I have had numerous questions about this bread.
This is a bread recipe that anyone should be able to bake. The pictures will hopefully help provide visuals that a novice can follow.
Gluten Free Bread Recipes
Honey and Oat Gluten Free Bread is a favorite in my house for morning toast and for sandwiches as well.
For a couple of quick bread options, this Sour Cream Banana Bread and these Chocolate Chip Pumpkin Muffins get made on repeat.
Gluten Free Sandwich Bread Recipe
Once you’ve added all the ingredients, beat the mixture at high speed for 3 minutes.
This adds air to the thick batter, which helps take the place of the missing gluten as far as structure is concerned. It will create a much fluffier loaf of bread, similar to store-bought varieties.
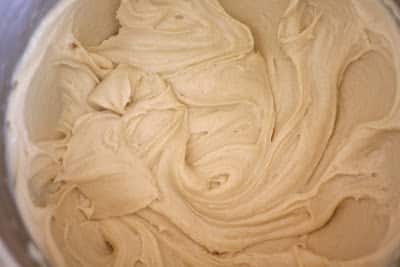
At the end of 3 minutes, the batter will look like thick, heavy buttercream icing: smooth and silky. It should not look at all like a typical yeast dough.
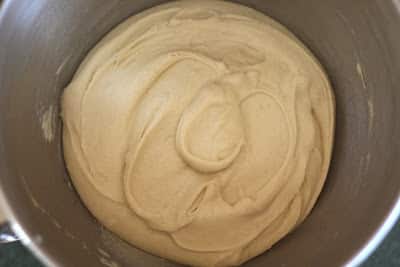
The dough will be very sticky, and feel a bit gritty if you rub some between your fingers. Scrape the sides of the mixing bowl and leave the batter right in the bowl to rise for the first time.
Cover the bowl with a light towel or loose plastic wrap and let the thick batter rise for 90 minutes. This batter might not completely double in size, but it will puff up considerably.
Lightly grease an 8 1/2” x 4 1/2” loaf pan with butter. Gently stir the batter down. Scrape it into the prepared pan. The dough should still be wet and not at all knead-able. It reminds me of a very thick brownie batter at this stage.
Using dampened fingers, or a wet spatula or bowl scraper; smooth the top, eliminating as many wrinkles, bubbles or creases as possible. The smoother your loaf is before this final rise, the smoother it will be once it’s baked.
After the dough rises and bakes, the top of the loaf will look very much the same as it looks when you finish smoothing it out. It is worth a minute or two of effort to make it as smooth as possible now.

Loosely cover the pan with a towel (or a lightly greased piece of plastic wrap) and let the dough rise until it barely crowns over the rim of the pan.
This will take 45 – 60 minutes, or possibly as much as 90 minutes, depending on the temperature of your kitchen. Towards the end of the rising time, preheat the oven to 350°F.
This dough is fairly delicate. Try not to touch it again at all. Any finger touch or bump will be visible after the bread is baked.
Kitchen Tip: I use this mixer, this scraper, and this loaf pan to make this recipe.

Tender High Rising Gluten Free Sandwich Bread
Ingredients
- 2 cups brown rice flour
- ⅔ cup potato starch this is NOT the same as potato flour
- ⅓ cup tapioca starch
- 3 tablespoons sugar
- 2 teaspoons instant yeast
- 1¼ teaspoons kosher salt
- 1¼ teaspoons xanthan gum
- 1 cup warm milk
- ¼ cup butter softened to room temperature
- 3 large eggs
Instructions
- Combine all of the dry ingredients in a mixing bowl, or the bowl of your stand mixer. I’ve made this using both the KitchenAid and a hand mixer. Both methods work well, admittedly the stand mixer is much easier.
- While using an electric mixer (hand mixer, or stand), slowly pour in the warm milk. The mixture will be mostly crumbs at first, but once all the milk is added, it will begin to come together. Add 4 tablespoons of softened butter and beat until thoroughly blended.
- Add the eggs, one at a time. Beat the mixture after each egg is added, until it is thoroughly integrated before adding the next one. Once you’ve added all the eggs, beat the mixture at high speed for 3 minutes. This adds air to the thick batter, which helps take the place of the missing gluten as far as structure is concerned. It will create a much fluffier loaf of bread, similar to store bought varieties.
- At the end of 3 minutes, the batter will look like thick, heavy buttercream icing: smooth and silky. It should not look at all like a typical yeast dough. The dough will be very sticky, and feel a bit gritty if you rub some between your fingers. Scrape the sides of the mixing bowl and leave the batter right in the bowl to rise for the first time.
- Cover the bowl with a light towel or loose plastic wrap and let the thick batter rise for 90 minutes. This batter might not completely double in size, but it will puff up considerably.
- Lightly grease a 8 1/2” x 4 1/2” loaf pan with butter. Gently stir the batter down. Scrape it into the prepared pan. The dough should still be wet and not at all knead-able. It reminds me of a very thick brownie batter at this stage. Using dampened fingers, or a wet spatula or bowl scraper; smooth the top, eliminating as many wrinkles, bubbles or creases as possible. The smoother your loaf is before this final rise, the smoother it will be once it’s baked. After the dough rises and bakes, the top of the loaf will look very much the same as it looks when you finish smoothing it out. It is worth a minute or two of effort to make it as smooth as possible now.
- Loosely cover the pan with a towel (or a lightly greased piece of plastic wrap) and let the dough rise until it barely crowns over the rim of the pan. This will take 45 – 60 minutes, or possibly as much as 90 minutes, depending on the temperature of your kitchen. Towards the end of the rising time, preheat the oven to 350°F.
- This dough is fairly delicate. Try not to touch it again at all. Any finger touch or bump will be visible after the bread is baked.
- Bake the bread for 25 minutes, until golden brown. Remove it from the oven, and using hotpads for both hands, immediately turn it out of the pan onto a rack. Brush with a very small amount of melted butter to help keep the crust soft, and add flavor. Slice when completely cool. Enjoy!


Hmmmm… I take it potato flour is not the same as potato starch? The bread tastes good, but the batter was not at all the consistency you described, and the bread is dense. Back to the store to search for potato starch for a second try!
Potato flour is definitely not the same thing as potato starch. I am so sorry for the mix up with the recipe. The starch will allow for a much fluffier bread. It shouldn't be dense at all. Good luck!
Tried it again – this time with potato starch. Tasted wonderful! I did have a question – what is the best way to store the bread? Fridge? Cupboard? I found that it did get a little crumbly after a couple days…
I'm glad you like it. I keep mine on the counter for 2-3 days, but after that, I would wrap it tightly and put it in the freezer. Ours doesn't usually last that long though. If you know you won't use it within a few days, I would cut the loaf in half next time and freeze the un-sliced half wrapped tightly in foil. That way it will be good as new when you are ready to eat it. The sliced bread will freeze fine, but I prefer freezing it unsliced.
Thanks! Making it again today. The only one who is GF is my son, so freezing half is a great idea. I also use almond milk and Earth Balance butter spread, which might make a slight difference…
This is definitely our favorite GF bread recipe so far! Thanks!
I made this bread with almond flour instead (I didn't have rice flour) and it is delicious!
May I use s food processor and or a bread maker?
Thanks,
gail
I have not personally tried this bread in a bread machine. However, in the comments above, a few people have had luck with doing that and then posted their method in the comments. Good luck!
I tried the recipe today and it didn't rise as tall as yours; maybe I didn't let it rise far enough before I put it in the oven? It was at the edge of the pan~~smells wonderful and too hot to slice.
My mixer didn't like the job at all tho~~it's an old hand mixer and I guess I'll need to get another one. Any suggestions?
Thanks,
gail
ONG! I don't care how high it didn't rise! This bread is WONDERFUL!!!! I couldn't wait till it cooled and it sliced wonderfully!!!!Life begins anew!!THanks so much and I can't wait till you come up with honey!
THANK YOU SOOOO MUCH!!!!
Gail, I am thrilled that you are so happy with the recipe. I do have a honey recipe posted that I absolutely love. Here is the link. http://barefeetinthekitchen.blogspot.com/2012/10/honey-and-oat-gluten-free-bread.html
This bread is awesome! Thank you so much!
Thanks so much for your Gluten Bread recipe! Can I just let it rise once?
I don't think that it will be nearly as fluffy or light without the second rise, but might be worth trying. If you do, let me know how it works out.
Mary,
I have made this bread twice. After the second rise it will not rise anymore in the oven. What am I doing wrong? Today I ordered a bread machine that will make Gluten bread……I am sad that I can't get it to rise in the oven. Any thoughts?
Are you punching it down after the second rise? It should be at least to the top of the pan at that point and that is when you place it in the oven. It isn't supposed to rise a third time. I might be misunderstanding you though.
It should rise once in the bowl and then once in the pan, the height of the rise when you place it in the oven is as tall as it will get. Does that help? Is it not rising in the pan at all?
I only let it rise once in the mixing bowl ( KitchenAid ) than stir down into the bread pan and let it rise again (only 2 times). The last one only turned out to be 2 inches tall. I am NOT giving up! Thanks for your help. Is it ok to let it rise 2 hours? Maybe one hour is not enough… I have also tried 1.5 hours – no help. 🙂 I will keep trying.
Definitely let it keep rising. My last loaf took just over two hours, because the house was much cooler than usual. Fingers are crossed that it will cooperate for you this time!
I take a hand towel and wet it with hot water, squeeze it out and then drape it over the pan with the dough in it. If necessary, I also will turn my oven on and set the pan in the corner where the steam comes out of the cooktop. That seems to make a world of difference. I do this because my house is always cold. Hope that helps a bit.
My grandson is allergic to gluten and eggs. This recipe looks great but do you think it will work with egg replacer?
Martha
This should work fine with an egg replacer. If I recall correctly, one of the earlier comments on this post mentioned making the bread without eggs.
Thanks sooo very much for this wonderful recipe! My 15 year old daughter has recently developed a gluton intollerance and being able to eat this bread has made her life without gluton a bit easier to get used to.
Just making this and in my first rise and it does not look at all like the pic's. But after reading the comments realized I used potatoe flour instead of potatoe starch…we'll see what happens.Thanks for the recipe !
I have made this recipe several times now, it is very delicious and fairly simple to do. For the first time right now I used almond flour in place of the rice. It is on its first rise, a suggestion by another poster and since my husband loves almond flour thought I'd give it a try. The consistency after the three minutes though is different than normal, hope that's the way it's supposed to be. We will find out 🙂 I have had a problem though and can't figure it out, it rises fine both times and bakes just fine doesn't seem to fall any, but it does not come out sandwich size. Could it be my pan? I have tried two different ones, the regular metal bread pan and I have a smaller rubber new age type very annoying pan that actually seems to work the best which drives me nuts haha love traditional pans. I did however mix everything up well before starting the milk, butter etc…. And the last loaf seemed better although I wouldn't know for sure cuz I gave it to my neighbor! I also question the attachment I'm using on my kitchen aid stand mixer, the only one that seems to work is my dough hook. Sometimes it just doesn't get to mixing things in a timely manner I have to help it. Hummmmm is there a better attachment to use? Just wanna say also that I do love the recipes and I'm trying the honey oat one here soon! Thanks so much!
I use a standard kitchenaid paddle when making this bread. The dough hook wouldn't whip enough air into the batter when I tried it that way. I do use a slightly smaller than average bread pan, I think it's about 8" x 3.5" or 4".
Let me know how the almond flour loaf turns out. I haven't tried that yet myself!
Asian supermarkets are a great source for Tapioca starch and potato starch. It's not certified gluten free but I am gluten intolerant and not celiac so it works for me. It's about 1/5th of the prices at the health food store!
East Indian stores carry Sorghum flour (Jowar), chickpea (garbanzo)flour and lentil flour at a fraction of the price of the healthfood store.
You can substitute xanthum gum and/or guar gum with flax and chia mixed and boiling water. Check out http://www.glutenfreegirlandthechef.com for instructions.
I was diagnosed with Celiac in June 2012 and have been searching for a good gf bread since. Every one I have tried (all store-bought) has crumbled far too easily. I am now considering baking my own bread and this appears to be a recipe I can handle.
I am curious. Would quinoa work with this recipe instead of the rice flour? I enjoy quinoa's nutty flavor and want to try a bread made with quinoa flour.
I am actually working on a quinoa recipe now. You should be able to substitute quinoa for the rice flour, provided you substitute by weight and not by volume. If you do try it, please come back and let me know how it worked for you! Good luck!
Baked the bread today. Here's what I did: I used one cup of brown rice flour and substituted quinoa flour for the other cup (measured by weight). Used all tapioca starch instead of potato and tapioca starch. Substituted honey for one tablespoon of sugar. I did not see instant yeast at the store so used active dry yeast (and incorrectly so bread didn't rise all that well). I need to play around with oven temp/cook times. I took the bread out at 20 min and the crust was still a tad overdone. Outside of the two things I mentioned (yeast and crust) the bread turned out pretty well.
I have made this bread twice now. I was hoping for something lighter and a little more sturdy. This one is a bit dense and, even though not too crumbly in the first couple days after making it, falls apart fairly easily.
The first time I made it I doubled the ingredients and followed the recipe exactly except I used almond milk instead of dairy milk, the dough rose a TON both times (in less than the time recommended for rising) and I got two beautiful loaves, one of which I froze, the other we consumed within 3-4 days. I tried making grilled cheese with it – it worked okay, but the flavor was not what I'm used to (just recently switched to gluten free, so when I say "used to" I'm talking wheat bread), and it was only holding together from the melted cheese. The bread itself was breaking, but the cheese kept it from completely coming apart. The second (frozen) loaf behaved much like the first, only a little more fragile after thawing.
The second time I made it I was going to be sharing with someone who is dairy free so I used unsweetened almond/coconut milk and an oil blend – canola, olive and grapeseed oil, in place of the milk and butter. I did not baste the loaf when it came out of the oven b/c I took it to a potluck and baked it there, so someone else took over when it came out of the oven. This second loaf did not rise as well and was just as dense as the first one. This time around I also added 1/2 tsp. extra xanthan gum, hoping that would help hold it together. Doesn't seem to have made a difference. The taste is not terrible, but it's not what I would enjoy with deli meats. It's great when toasted and buttered, esp. with jelly or apple butter, though I have to cut it thicker to keep it from breaking when taking it out of the toaster.
All in all I would give it maybe 3 1/2 stars out of 5. I just wish it was easier to make a gluten free bread that has the consistency of wheat bread!
~Bernadine in KCMO
Hi Bernadine,
I haven't tried this recipe with oil instead of butter, but that shouldn't contribute a great deal to the difference in rising times. I have not had much luck with transporting GF doughs between rise times. They never seen to rise as much as when they are on the counter at home undisturbed.
If you haven't tried it already, this GF Honey and Oat Bread recipe is the closest I've come to a bread that tastes more like the wheat breads I used to make. http://barefeetinthekitchen.blogspot.com/2012/10/honey-and-oat-gluten-free-bread.html
Mary
Can this be made into a french baguette shape? If I don't butter the crust do you think it would end up crunchy like french bread?
You won't get a truly crunchy crust with this bread. If you have a french bread shaped pan (I do not) then you could shape it that way. You won't be able to form this dough into that shape though. It is a very wet dough that is basically poured into a loaf pan.
Hi Anonymous,
You said your breadmachine had a gluten free setting. Can you please let me know which breadmachine you used?
Thanks
Sharon
Hi Shirley, Thank you for sharing the recipes with everyone.I have a question and would be grateful if you could guide me. My boyfriend recently developed gluten intolerance and tried to find a Gluten-Free bread for him, so I tried couple of G-free recipes in my breadmacker (including the one suggested by my bread machine, and some few others with different flours). All results turned out looking great (high rise, beautiful texture etc.) but they had “AWFUL” taste and smell! I just had to throw them out! Though I had bought and tasted prepared G-free bread (like Udi’s white sandwich bread) and I thought they tastes wonderful to me! So I was wondering what is the matter with this awful result that I get!!? all my ingredients are Bob’s Red Mill and I tasted them in my mouth to see if I can realize which ingredient has that bad taste?!!
The recipes I used combined these ingredients:
1.Rice Flour (I used whole grain brown rice flour)
2.Potato starch flour
3.Tapioca flour
5.Xanthem
6.Salt/sugar/yeast/eggs/milk
* In one of the recipies I used 1cup rice flour and replaced the other cup with Bobs redmill G.Free whole purpose flour.
I would appreciate if you could help me with this issue.
Best
Sepi
I am sorry that you have been struggling with the other bread recipes you've tried. I do not know why they taste strange to you. Those are all fairly common ingredients in GF bread making. It is possible that one of your ingredients has gone bad, but I don't know whether you'd be able to taste and tell that.
How old are your flours? GF flours have a very short shelf compared to regular AP flour. I keep mine in the freezer or refrigerator, in air tight containers.
My husband & I are choosing to go to wheat & gluten free foods as I have been looking for a good wheat & gluten free bread recipe. I have tried all kinds of recipes which have produced a dry & very heavy bread that did not taste very good. I found this recipe the other day & I made it today.I did add 1 tablespoon of honey & It is the best bread I have ever made & eaten, my husband really loves it too! so thank you for sharing this recipe. I will be making a lot of it!
I would assume it is the Bob Red Mills GF All purpose flour mix. I have read meany reviews that the Garbanzo bean flour has a strong taste and BRM's uses it as a main ingredients. I have tried white bean flour and it is strong as well and I read it is suppose to be milder. My husband who is allergic to wheat would not eat the bread I made with it because of the strange smell and taste.
I can't wait to make this!!!!
I just have a quick question…..is instant yeast the same as Rapid Rise yeast or is it just the active yeast.
Thanks!
Denise
Hi Denise, I've actually used both types when making this bread. Instant yeast, IS Rapid Rise yeast. However, I typically just use the Active Yeast that I keep on hand more frequently.
Hi Mary,
First and foremost a big thank you for sharing this recipe. I am too (like all your people that have tired your recipe) a big fan!
I’ve tried the recipe a few times and they have all been fairly successful. Mine don’t rise as much as they should but I’ve only just found out the importance of the starches. I’m intolerant to potatoes so I had been substituting the potato startch with buckwheat flour (still using 1/3 cup of Tapioca), I think I need to sub starch for starch so I’ll use corn starch for the next batch.
My partner is also dairy and sugar intolerant, so I’ve been using rice milk and Olivani (olive oil based butter/margarine substitute) instead and they’ve been working well. For the sugar just use a very small amount of stevia which seems to do the trick (I had originally used suger in my first batch and I found the bread too sweet).
I was just wondering what the necessity of raising the mixture in 2 different containers..? I find that it rises quite well in the mixing bowl and then when I transfer it to the baking tin it loses some of it buoyancy and doesn’t rise that well from here. One suspicion I have is that I’m not smoothing the top of the mixture properly once it’s in the baking tin thus letting air escape through the top via cracks…? (Otherwise it could be the lack of starch…?)
In any case I was wondering if there’d be any harm in transferring the mixture straight from the mixing bowl into the baking tin and allowing it to rise for a couple of hours there..?
I'm glad you like the bread, Dean. I don't see why you couldn't do both rises in the pan. As long as you are still stirring it down and then smoothing the top before letting it rise the second time, it should be fine.
You definitely need a starch to replace the potato starch. You'll probably notice a difference in the texture with the next batch. Let me know how the cornstarch works for you!
I have made this bread twice. The first time, everything went well, the bread looked beautiful after the suggested bake time….but it was completely gooey in the middle and I had to throw all but the first couple of slices from the ends away.
I made it for the second time yesterday, and this time I looked online to see what temperature it should be when done. I think my first mistake was I inadvertently let it rise too much during the second rise. It was a bit over the top of the pan. As a result, it oozed all over my oven, creating clouds of smoke, etc. What a mess! When I checked the temperature toward the end of the suggested bake time, it was nowhere near what online advice said it should be, so I put foil over it and kept baking. I think I had it in the oven about twice a long as the recipe suggested, before it was the correct temperature–and this time (aside from the mess in the oven and the smoke in the house!), the bread was great.
I don't know why mine is taking so much longer to bake. It's a good recipe in that the ingredients are easy enough to find, and the taste is wonderful, but to me the bake time was way off.
Also, I have been doing a lot of reading about GF baking [just recently started going GF, to see if it helps ease my arthritis], and one article said GF items only need to rise once. Have you tried that? I wonder if that would work with a comparable result??