This post may contain affiliate links. Please read our disclosure policy.
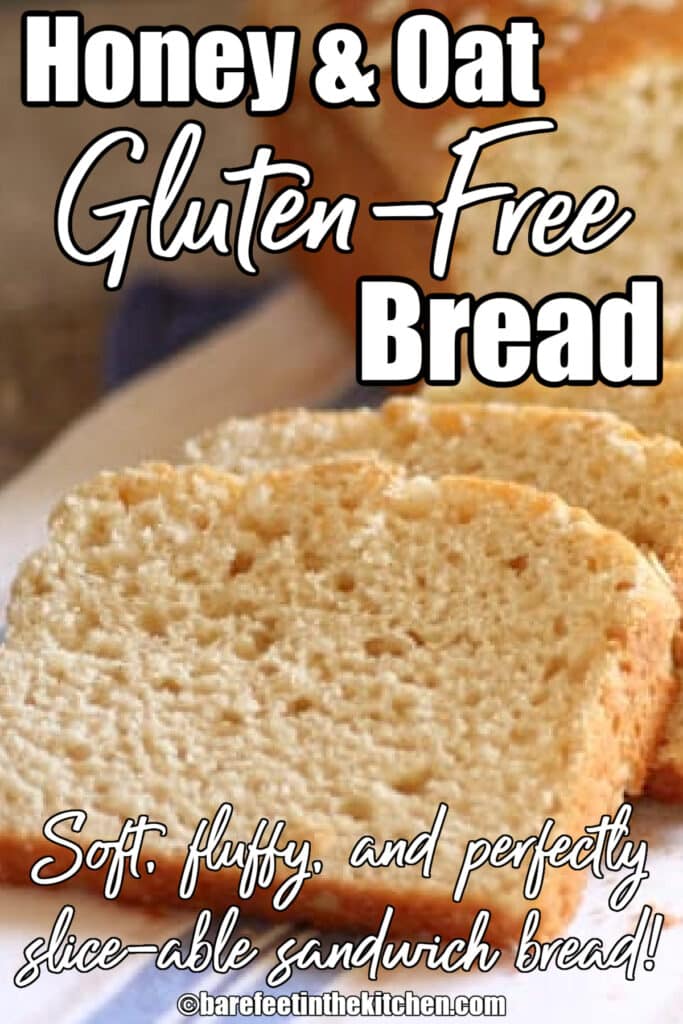
Soft, fluffy, and perfectly sliceable gluten-free sandwich bread with a rich flavor from oat flour and honey.

Gluten Free Oat Bread
After a few months of making and very much enjoying soft and fluffy gluten free sandwich bread, I realized I missed the deeper flavors that are typical in whole wheat sandwich bread.
So, I started playing with that recipe. (The original is closer in flavor to a traditional light wheat or white sandwich bread.)
I love, love,love this bread! It’s a bit time consuming with the 2 rises but the texture and taste are lovely! I bake it in my 1 lb Pullman pan then slice it after cooling and freeze. So much better than any store bought gf bread!
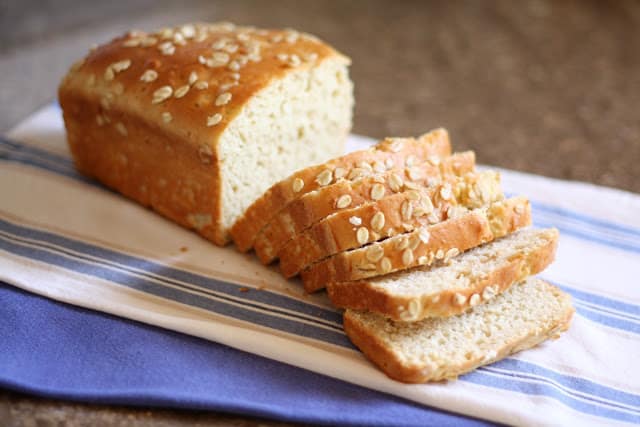
Gluten Free Honey Oat Bread
I’ve made this recipe at least five times now and I am very excited to finally share it. This bread is perfect for sandwiches, toast, or as a snack on its own.
Try a slice toasted slathered with restaurant-style whipped strawberry butter or vanilla bean whipped honey butter.
Add a smear of peach jam or apple butter for a treat that you won’t soon forget.

If you enjoy step-by-step photos, there are a whole lot of photos included with the original Gluten-Free Sandwich Bread post. This dough appears the same in each stage and those photos can be used for reference.
Recipe Tip
When baking this bread, testing for doneness with an internal thermometer is recommended. The internal temperature should be 190-200°F when the loaves are done baking.
I find that a baking time of 25-30 minutes is almost always perfect in my oven with my dark baking pans. HOWEVER, several readers have needed to add an addition 10 – 25 additional minutes to that baking time for their ovens. It’s worth taking a moment or two and reading through some of the comments left on this post along with the hundreds of 5-star ratings.
Baking can be finicky and baking with gluten-free ingredients can be even more so at times. Once you’ve dialed in the perfect baking time for this bread though, it will be the most reliable gluten free bread you can possibly make.
For a few more great gluten-free recipes to try, check out these Gluten Free Flour Tortillas, the Sour Cream Banana Bread, this Hershey’s Chocolate Cake, and the Best Gluten-Free White Cake.
This Homemade Nut and Seed Paleo Bread from Cotter Crunch looks like a terrific option for toast too.
If you are not in need of Gluten-Free recipes, check out a few of our favorite whole wheat bread recipes:

Honey and Oat Gluten Free Bread
Ingredients
- 1 cup brown rice flour
- 1¼ cups oat flour make sure the flour is certified GF
- ⅔ cup potato starch
- ⅓ cup tapioca starch
- 2 teaspoons instant yeast
- 1¼ teaspoons kosher salt
- 1¼ teaspoons xanthan gum
- ¾ cup warm milk
- ⅓ cup honey
- ¼ cup soft butter
- 3 large eggs
- Optional: sprinkle of oats for the top make sure the oats are certified GF
Instructions
- Place the flours, starch, yeast, salt and xanthan gum in a mixing bowl, or the bowl of your stand mixer. Warm the butter and honey in a glass bowl or cup until the butter is melted. Whisk or stir it together and set aside.
- Using an electric mixer (hand mixer, or stand), gradually beat the warm milk into the dry ingredients. The mixture will be crumbly at first, but once all the milk is added, it’ll come together. Add the melted butter and honey to the mixing bowl and beat until thoroughly blended.
- Add the eggs, one at a time. Beat the mixture till each egg is thoroughly integrated before adding the next one. Once you’ve added all the eggs, beat the mixture at high speed for 3 minutes. This adds air to the thick batter, which helps take the place of the missing gluten as far as structure is concerned.
- At the end of 3 minutes, the batter will look like thick, heavy buttercream icing: smooth and silky. The dough will also be very sticky, and feel a bit gritty if you rub some between your fingers. Leave the batter right in the mixing bowl and cover the bowl with a light cloth or plastic wrap.
- Let the thick batter rise for 60-90 minutes. This batter won’t double in size, but it’ll definitely puff up. Gently stir the batter down. Scrape it into a lightly greased 8 1/2” x 4 1/2” loaf pan.
- Use your wet fingers, or a wet spatula or bowl scraper, to smooth the top, eliminating any “wrinkles.” The smoother your loaf is before you put it into the oven, the smoother it’ll be once it’s baked.
- Lightly sprinkle the top of the loaf with oats and press lightly into the loaf. Loosely cover the pan and let the dough rise till it barely crowns over the rim of the pan. 45 – 60 minutes, as much as 90. Towards the end of the rising time, preheat the oven to 350°F.
- Bake the bread for 25 minutes, until golden brown. Remove it from the oven, and turn it out of the pan onto a rack. Lightly brush with melted butter to help keep the crust soft, being careful not to brush off the sprinkling of oats. Slice when completely cool. Enjoy!
{originally published 10/16/12 – recipe notes and photos updated 4/15/22}


Can I use this recipe in my bread maker? What do I need to change? Thanks in advance for your response.
I just cooked my first loaf of this recipe. I followed the recipe maticulously and I used my Bosch stand mixer. Everything was going great! Looked absolutely beautiful. I pull d it out of the oven and proceeded to dump it onto a cooling rack and from the middle of the bread a hole ripped out of the middle of the loaf and raw batter poured out! I cooked it at 350 for 25 minutes as stated. The only thing I can think of is I could have cooked it on a lower rack? No idea. I put it back in for 10 minutes. We will see how it goes.
Hi Mary. Just wondering if you have tried putting the batter in the refrigerator overnight either after the first rise or counting it as the first rise. Then in the morning, the dough could be placed in the bread pan and allowed to rise again. It would be more convenient for me to make it that way .
What are you, some sort of magician?? I love this bread! It’s the best gluten free bread I’ve eaten – homemade or store bought! Thank you for showing me that I can still bake delicious bread (there’s nothing I like to bake more than bread!) even after having to go gluten free. Hugs to you!
I am THRILLED that you love it as much as we do, Carol. I was absolutely determined to make a GF bread that tasted every single bit as delicious as wheat bread. Enjoy!
Sounds good but can I substitute arrowroot flour for the potato starch?
I’ve never tried that substitution, but they are very similar. If you do try it, please let me know how it works for you.
Has anyone tried making this with flax egg instead of real eggs? We’ve got egg and wheat allergies in the house and it’s so hard to find a good bread recipe that fits both!
I’ve never tried that myself, but it’s worth a shot. If you do try it, let us know how it works!
Christine, I am wondering the same thing about subbing flax eggs for real eggs. Did you try it? If so how did it turn out? I need to find a new bread for myself as my baby (I’m nursing him) is intolerant to dairy, wheat, corn, soy, and eggs. I can’t find anything at the stores and I miss having “bread” for sandwiches, etc. Almond flour tortilla wraps can only fill me up for a bit before I get hungry again.
Can I substitute psyllium for the xanthan gum?
I have no idea how that would work. If you typically are able to do that, it’s worth a try.
Will this recipe work in a bread machine?
I have no idea. I’ve never tried it with a bread machine, but it’s likely worth trying. If you do give it a shot, please let us know how it works for you!
My first loaf is in the oven. Recipe was easy to follow and the comments about appearance were helpful. I am curious about the cooking time 25 minutes doesn’t seem long enough. Is there an internal temperature I should look for. I would hate for this effort to go to waste as noted in the first comment above.
I don’t get it. The first time I made this it turned out great, except that the center was raw. THREE wasted attempts since have yielded a too dry dough! I can’t figure out what I’m doing differently. The first attempt, I added the milk, butter, and honey all together. Very clumpy and crumbly without the smooth icing texture described.
Hi Amy, it sounds like the bread didn’t cook all the way through the first time you made it. Was the weather different the following times? Or were you possibly measuring differently? If you’re scooping, tapping, shaking it into the cup, you might be getting significantly different amounts of dry ingredients. I typically scoop the flours, and level it off without shaking at all. It’s very odd that you’re seeing such different results. Without being in your kitchen with you, it’s hard to even guess.
Okay, my bad. The first time I tried this recipe I didn’t have potato starch, so I used the corn starch I had. Turned out great except for raw in the center of the loaf. Went to the store to get potato starch and all I saw was potato flour. Thought is was the same—WRONG!
Is using mixer a must?
I made this recipe this afternoon. I made one change to the ingredients to make it more heart-healthy by changing the margerine to olive oil. I baked them in small low pans giving me a bread the size of a hamburger bun. Clearly, this is a size for 2-3 servings in our house.
Follow this link to see a visual of my baking.
Is it really only 3/4 c of milk? Just tried mixing this and by the time I added the honey and butter mixture and eggs it was the consistency of regular bread dough. I think I added at least another cup of milk. Going to try finishing, but I doubt it will turn out. To me that’s not enough liquid for 3 cups of “flour”
This turned out amazing. The first yeast bread I’ve had that wasn’t epic fail! Thank you! So this is gonna sound like a newbie question but how do you recommend storing this?
I store it airtight. But really, it depends on where you live and how humid it is. If you’re not going to eat it within a couple of days, I’d store it sliced in the freezer. Enjoy! (and I’m thrilled you like it!)
Dinner rolls bake in 18-22 minutes. A loaf of bread generally takes 45 to 55 minutes. While a small loaf could bake in 25 minutes, I suspect this is a case of a typo. If you have an instant read thermometer, the internal temperature should be, depending on the recipe, between 195* and 210* Fahrenheit. If you bake in a clear glass Pyrex loaf pan, you can see the brown crust on the sides and bottom. I made this recipe. I baked it for 35 minutes and it wasn’t done. 10 more minutes and it reads at least 190 degrees…i stopped when it reached that point because the top and all sides had nicely browned crust. After you’ve made the same recipe a few times, you’ll know how long it needs. Best wishes.
Thank you.
I’m allergic to gums
Does it really need it for this bread to turn out
Was thinking chia or flax to replace xantam gum.
Any suggestions?
I honestly can’t speak to that. I don’t have a lot of experience baking breads without them. That said, there are a lot of comments on this post with different adaptations readers have made. It’s likely worth reading through to see how it has worked for others.
I just read that pectin can be used instead of gums… Might be worth a try!
Hi, I added chia seeds in replacement of xanthan gum to my own bread recipe and it worked out totally fine! The chia seeds helps keep it moist and is also a great replacement.
I just posted this in a longer post but you can use Pamela’s Not Xanthan Not Gum binding mix. Worked great.
My cousin is gluten free and cannot have eggs. This is my favorite gluten free recipe ever. Have you attempted this recipe with an egg replacer? Thanks!
I am wondering this too!
I just tried it with Ener- g egg replacer and it worked great.
That’s good to know! Thanks for your help, Stephanie.
So good! A bit more of a sweet oatmeal muffin than I expected, but so delicious everyone keeps stealing my GF bread! I didn’t have the brown, so I went with the white rice flour. One thing I really appreciated that you did was you discussed the texture of the dough before the first rise as a buttercream frosting. I live in the desert and would you believe I had to add in a few tablespoons of water to get to that texture? I had more of a cookie dough texture before adding the water, but I knew it was not as it should have been, so I was able to make an informed decision! Thank you. I would definitely suggest to others to add a bit of water a T at a time in case they’re on the dry side (and this is something I almost always have to do for most recipes, everything here is dry, dry dry!)
Also, I’ve made some GF bread recipes but this is the only one that uses a 3 minute electric mixer extra whipping to add some air. No one is doing this, and I think it’s a great innovation, to add some air by hand. Thanks, very good research on this one!
This recipe is great! I had to make some modifications for allergies, and ended up with:
160 g (1 cup) brown rice flour
150 g (1 1/4 cup) cups gf oat flour
100 g arrowroot starch
44 g sweet rice flour
1 package red star instant yeast
1 1/4 teaspoons salt
1 tsp guar gum
1 tsp unflavored gelatin
1 tbsp white sugar
8 oz warm milk, 110 degrees
1/3 cup honey
4 tbsp melted butter
3 large eggs
I added the sugar because I forgot about the recipe using honey; just including it here to be thorough.
Unlike a lot of gf breads I have tried, this one isn’t liquidy, and it rises straight up. I put it in the oven too early, convinced I was about to have a huge mess if it rose over the edge. It kept rising and stayed in the pan! It did end up heavier/denser than the one in the photo. Still delicious though 🙂
Loved eating this toasted with a sunny-side up egg on top this morning. So delicious!
Almost forgot – I noticed someone else had issues with the time. I agree it’s probably a typo. My bake time was closer to 50 minutes. I tented it at the 25 minute mark, but would probably do it after 20 minutes in the future. When I took the bread out to cool, the thermometer was reading around 206°F. Hope this helps!
Me again 🙂 This has become a go-to recipe for me. Here are some things I have learned while making this bread. 1) The pan is really important! I used to use glass, but I switched to metal and it is much better. The loaf heats faster and rises more evenly, and the pan cools down after you remove it from the oven (which keeps it from drying out). 2) An old recipe I used suggested starting at 375 F, then reducing to 350 F when you tent the bread with foil (about 20 minutes into cooking). I strongly prefer this method. 3) I modified this recipe and used baking soda and lemon juice, to make a quick bread (I have an autoimmune disorder/allergy problems and have to make everything at home, so having a recipe that I can throw together quickly is really nice). My final recipe is: 160 g (1 cup) Brown Rice Flour, 150 g (1.25 cup) GF Oat Flour, 44 g White Rice Flour, 100 g Arrowroot Starch, 39 g (6 tbsp) Ground Flax Seeds, 1.25 tsp Sea Salt, 1 tsp Baking Soda, 12 oz Whole Milk, 4 tbsp Olive Oil, 60 g Honey, 3 Large Eggs, and 4 tsp Lemon Juice. I mix all the dry ingredients in a bowl, then add the wet. Eggs go in one at a time, and Lemon Juice goes in last. Oh and I almost forgot – weigh the ingredients! It’s way less cleanup, and is more accurate. Thanks so much for posting this. I would not have been able to make this bread without this post!!!