This post may contain affiliate links. Please read our disclosure policy.
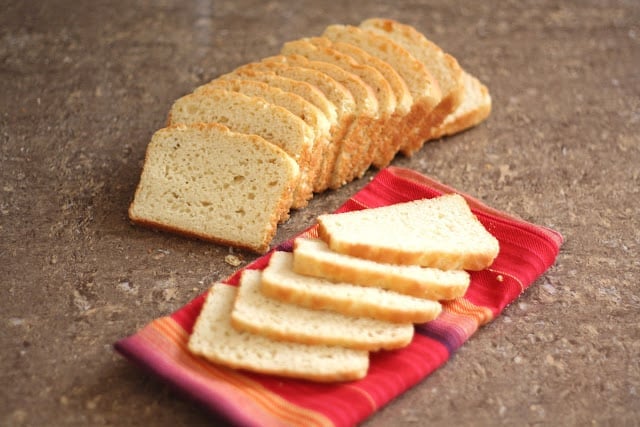
This is a soft and fluffy gluten free sandwich bread that tastes great and can be sliced incredibly thin.
I have never sliced a loaf of homemade bread this thinly. I average about 2-3 slices for every inch of this bread. An 8 1/2″ loaf pan usually results in about 20 slices.
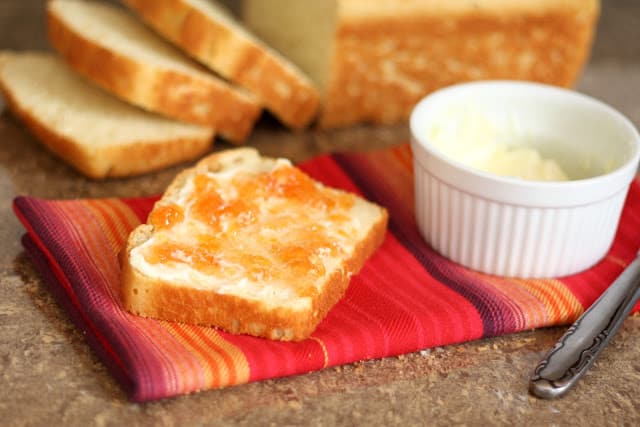
Sliced thick and thin, we’ve been eating this bread with breakfast (it cooked beautifully for this Fruity French Toast), lunch, dinner or even as dessert a few times. With homemade peach jam, it is a treat that the whole family enjoys.
Gluten Free Sandwich Bread
I’ve played with this recipe for a while now and it produces a very dependable loaf of bread. Two things to note here: first, measure the ingredients carefully.
Scoop the flours into the measuring cups with a spoon and then level off the flour with the back of a knife. Also, when pouring the dough into the pan for the final rise, make sure to press down enough to remove any air bubbles.

Trapped air bubbles = a hole in the center of the bread. The air pocket won’t cause it to bake differently and it won’t affect the taste, but it will make for an odd sandwich.
This method is proven and I am beyond thrilled with the results. I’m including a lot more pictures than usual with this post because I have had numerous questions about this bread.
This is a bread recipe that anyone should be able to bake. The pictures will hopefully help provide visuals that a novice can follow.
Gluten Free Bread Recipes
Honey and Oat Gluten Free Bread is a favorite in my house for morning toast and for sandwiches as well.
For a couple of quick bread options, this Sour Cream Banana Bread and these Chocolate Chip Pumpkin Muffins get made on repeat.
Gluten Free Sandwich Bread Recipe
Once you’ve added all the ingredients, beat the mixture at high speed for 3 minutes.
This adds air to the thick batter, which helps take the place of the missing gluten as far as structure is concerned. It will create a much fluffier loaf of bread, similar to store-bought varieties.
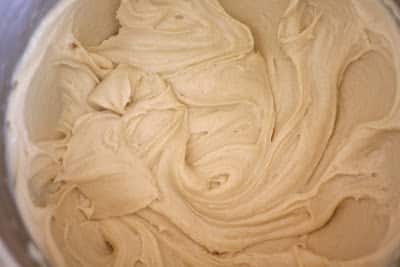
At the end of 3 minutes, the batter will look like thick, heavy buttercream icing: smooth and silky. It should not look at all like a typical yeast dough.
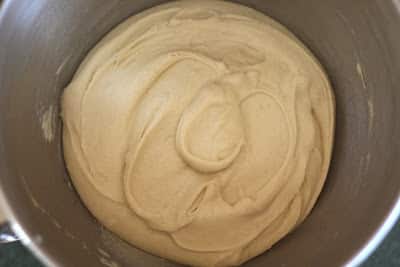
The dough will be very sticky, and feel a bit gritty if you rub some between your fingers. Scrape the sides of the mixing bowl and leave the batter right in the bowl to rise for the first time.
Cover the bowl with a light towel or loose plastic wrap and let the thick batter rise for 90 minutes. This batter might not completely double in size, but it will puff up considerably.
Lightly grease an 8 1/2” x 4 1/2” loaf pan with butter. Gently stir the batter down. Scrape it into the prepared pan. The dough should still be wet and not at all knead-able. It reminds me of a very thick brownie batter at this stage.
Using dampened fingers, or a wet spatula or bowl scraper; smooth the top, eliminating as many wrinkles, bubbles or creases as possible. The smoother your loaf is before this final rise, the smoother it will be once it’s baked.
After the dough rises and bakes, the top of the loaf will look very much the same as it looks when you finish smoothing it out. It is worth a minute or two of effort to make it as smooth as possible now.

Loosely cover the pan with a towel (or a lightly greased piece of plastic wrap) and let the dough rise until it barely crowns over the rim of the pan.
This will take 45 – 60 minutes, or possibly as much as 90 minutes, depending on the temperature of your kitchen. Towards the end of the rising time, preheat the oven to 350°F.
This dough is fairly delicate. Try not to touch it again at all. Any finger touch or bump will be visible after the bread is baked.
Kitchen Tip: I use this mixer, this scraper, and this loaf pan to make this recipe.

Tender High Rising Gluten Free Sandwich Bread
Ingredients
- 2 cups brown rice flour
- ⅔ cup potato starch this is NOT the same as potato flour
- ⅓ cup tapioca starch
- 3 tablespoons sugar
- 2 teaspoons instant yeast
- 1¼ teaspoons kosher salt
- 1¼ teaspoons xanthan gum
- 1 cup warm milk
- ¼ cup butter softened to room temperature
- 3 large eggs
Instructions
- Combine all of the dry ingredients in a mixing bowl, or the bowl of your stand mixer. I’ve made this using both the KitchenAid and a hand mixer. Both methods work well, admittedly the stand mixer is much easier.
- While using an electric mixer (hand mixer, or stand), slowly pour in the warm milk. The mixture will be mostly crumbs at first, but once all the milk is added, it will begin to come together. Add 4 tablespoons of softened butter and beat until thoroughly blended.
- Add the eggs, one at a time. Beat the mixture after each egg is added, until it is thoroughly integrated before adding the next one. Once you’ve added all the eggs, beat the mixture at high speed for 3 minutes. This adds air to the thick batter, which helps take the place of the missing gluten as far as structure is concerned. It will create a much fluffier loaf of bread, similar to store bought varieties.
- At the end of 3 minutes, the batter will look like thick, heavy buttercream icing: smooth and silky. It should not look at all like a typical yeast dough. The dough will be very sticky, and feel a bit gritty if you rub some between your fingers. Scrape the sides of the mixing bowl and leave the batter right in the bowl to rise for the first time.
- Cover the bowl with a light towel or loose plastic wrap and let the thick batter rise for 90 minutes. This batter might not completely double in size, but it will puff up considerably.
- Lightly grease a 8 1/2” x 4 1/2” loaf pan with butter. Gently stir the batter down. Scrape it into the prepared pan. The dough should still be wet and not at all knead-able. It reminds me of a very thick brownie batter at this stage. Using dampened fingers, or a wet spatula or bowl scraper; smooth the top, eliminating as many wrinkles, bubbles or creases as possible. The smoother your loaf is before this final rise, the smoother it will be once it’s baked. After the dough rises and bakes, the top of the loaf will look very much the same as it looks when you finish smoothing it out. It is worth a minute or two of effort to make it as smooth as possible now.
- Loosely cover the pan with a towel (or a lightly greased piece of plastic wrap) and let the dough rise until it barely crowns over the rim of the pan. This will take 45 – 60 minutes, or possibly as much as 90 minutes, depending on the temperature of your kitchen. Towards the end of the rising time, preheat the oven to 350°F.
- This dough is fairly delicate. Try not to touch it again at all. Any finger touch or bump will be visible after the bread is baked.
- Bake the bread for 25 minutes, until golden brown. Remove it from the oven, and using hotpads for both hands, immediately turn it out of the pan onto a rack. Brush with a very small amount of melted butter to help keep the crust soft, and add flavor. Slice when completely cool. Enjoy!


Heyo!!! Mary what a success this recipe is. I subbed in a few things like 1/3 C corn starch and 2/3 C tapioca starch (flour), 1 tbsp regular sugar, 1 tbsp truvia and I used 2 C Bobs Red Mill All Purpose Baking Flour Gluten Free and it turned out really nice still. I subbed the starches because I forgot about the potato starch (which I looked up online and that can be made from scratch but it's time consuming) and I had none. Next go round I will go by your exact measurements and ingredients because I want to see your vision through. 🙂 Thanks again!
My best, Lynn
This is a great recipe! I too have tried to play around with some measurements and ingredients, but really, yours is still the best! And I like someone else's suggestion about making hotdog buns with it. Thanks again!
Kim
(PS I must really like it, because I have never posted on a blog before!)
Just curious – is this recipe easily multiplied?
I'm trying it for the first time tonight – can't wait to see how it turns out!
I've doubled it in the past without any difficulty. More than that wouldn't easily work with my Kitchenaid. Good luck!
Hi! I used Cup 4 Cup flour (my favorite!) and no xantham gum and otherwise followed the recipe exactly… turned out totally awesome. The texture was soft and fluffy and as close to regular bread as I've ever made (I bake for a friend who is Celiac). It's a touch "egg-y" on the flavor, so I was thinking I might try an egg substitute and give that a shot. Thanks for this recipe!!!
–M.
I have been baking bread for many, many years with great success. Once I went gluten free about 8 years ago I have not had what I would I call a really successful loaf. Sure they've been delicious, I make all kinds, nuts, cheese, olive etc. but nothing that I could call fantastic. I have tried countless times to make them lighter, fluffier and easy to cut for sandwiches with some moderate success but NEVER have I made one this good. I even screwed this recipe up by adding only 1 tsp of yeast (I just got back from vacation and wasn't thinking clearly) so when I noticed it wasn't rising and realized my mistake, I dumped another tsp of yeast, 1/4 cup of warm milk and a 1/2 cup of flour back in my mixer with the dough AND it still came out awesome. It was difficult to put it into the bread pan so wet, it goes against all my experience but WOW. It's a perfect weight and consistency and doesn't have too much of a yeasty flavor that I've been trying to get rid of from my gluten free breads. Next time I will double it and throw some raisin's, nuts and brown sugar into one half before I put it into the loaf pan (one of my very successful tricks) and I expect it to be perfect again. I did alter the recipe to a full cup of tapioca instead of potato starch but the rest was the same. So as you can see, even with all my jerry rigging it still came out great. Thanks so much!
I am thrilled that it worked so well for you! I know exactly how you felt putting such a wet dough into the pan for the first time, but it really does work. Thank you for taking the time to tell me how much you liked it.
I have been gluten free for about 4 months now and have been eating Udi's bread. It's not bad but definitely leaves something to be desired. I stumbled upon your recipe and just made my first loaf today. It is absolutely delicious!!! I am so excited! The only problem that I had was that the temperature of my house is 68 degrees, so the dough didn't rise quite like yours did. It rose just enough in the oven though. Thanks for such a great recipe!
One question, how do you suggest storing it? I've got it in a ziploc bag at room temp. Should it be refrigerated? Can it be put in the freezer?
Thanks again!
Suzanne
runsuzannerun@bogspot.com
Hi Suzanne, Sorry for the delay in answering your question. I keep mine airtight at room temperature for 3-4 days. If it is going to be longer than that, I keep it tightly wrapped in the freezer.
Oh and btw, a hint for all your bakers out there, tapioca starch can be found MUCH cheaper in an Asian grocery if they have one near them.
Thanks for the tip 🙂
Made this in my breadmaker and turned out fantastic! I just had to babysit the mix phase a little since the corners don't get mixed well with non gluteny flours for some reason 🙂 I only had 1/2c potato starch so made up the diff with tapioca starch but I can't imagine it made a huge difference.
I just had my first homemade gluten free bread turkey sandwich on warm bread. YUM! I'd already had dinner, but I just couldn't help it, it tasted so good!
I've also made the honey oat bread in the breadmaker but that one overcooked so I need to try it again- it was still delicious though 🙂
@Anonymous – did you program 2 rises in your cycle? How long did you set the mix cycle?
My breadmaker has a gluten free cycle, so I just used that- looking in the booklet it mixes/kneads for 9 min, rises 25, kneads again though don't think it's the full 18 min it says I think it probably rests in there, rises another 45 min then bakes for 55. It was a bit flat on top, but it was still a nice sandwich size and sliced thinly.
Hi Anonymous 🙂 I have a bread machine, but it doesn't have a Gluten free setting. Do you think I could make this bread with my machine anyway using the Basic setting? Thanks so much so much for sharing.
I also mixed up the dough in my bread machine. Just ran the dough setting, not the entire cycle. It mixes up the dough and then allows for a 90 min rise I think. Anyway I let the entire dough cycle run, then turned it out into a loaf pan and shaped for second rise. This time it only rose to the top of the pan, but not over the top at all. IT also did not rise further in the oven, so the loaf ended up kind of flat looking on the top rather than tall and round. If only it had risen a few inches more and rounded out I think it would have been perfect. The taste was really good- definitely not wheat bread but definitely the best gluten free substitute I've tasted so far. I will make it again. Thanks for the recipe.
Using almond milk and it works great.
On my way into the kitchen to make this bread !!! Going to do it in the oven first, maybe I'll attempt the bread machine next time :-). Thank you Mary, so blessed to have found your blog.
Can I use oil instead of butter?
Oil should work fine, but I haven't tried it that way. If you try it, let me know how it turns out. Good luck!
We are new to GF and I am wondering how to store this bread for lunches? I made another loaf of GF bread ( not this recipe) turned out ok but my girls were not happy at lunch time. I made sandwiches the night before and put in fridge – then in the am in their lunch bag ( in a tupperware container) by lunch it was hard. I am baking your recipe Right now- how should i make lunches for them????
thanks Leanne
We don't have any brown rice flour, but have plenty of white rice flour. WIll is perform the same?
My daughters and I are both celiac/gf and really miss sandwiches! Thank you!
My dough literally exploded out of the pan and dripped in my oven on the second rise. I wonder why after wiping the mess in the oven and the pan i cooked them and they ended lookng good although a bit flat. Not round top like yours
Thank you, thank you, THANK YOU!!
There were literally shouts of joy in our house today.
I went ahead and used just the white rice flour, as that was what I had on hand, and it turned out great.
We have been gluten free for 8 months and in that time have tried numerous recipes and store bought loaves of gf bread. Oh, the stories we could tell!
I am ecstatic to FINALLY have a recipe that is safe for us celiacs and pleases the palates of the gf and non/gf alike 🙂
~chrissy
I'm sorry that I missed your earlier question, Chrissy. I'm so glad that your bread turned out well. White rice flour is almost always interchangeable with brown rice flour. It lacks some of the nutrients in brown rice flour and the brown rice flour has a slightly deeper flavor. However, I've used both in this particular recipe and it turns out great either way. Enjoy the bread!
This is the best recipe I have found for GF bread. I cannot thank you enough!!!
Also I tried the Beer battered mushrooms which were awesome as well.
I am now a dedicated follower!
I was so excited to see a beautiful gluten free loaf until I realized it had eggs and milk in it. I am a wheat free vegan and this has severely limited my bread choices. I do plan on using this recipe to see if I can substitute flax seed for egg and coconut cream for the milk and see if it can still be done.
I have been making this with coconut milk and non-dairy butter. The loaves taste great, though I can't seem to get it to stop overflowing in the oven when it bakes.
I'd love to hear how your egg substitution goes – I'm also hoping to eventually make a vegan version.
Just to test it, Belinda, what if you divided your batter into two pans next time? I've never had a problem with mine overflowing, so I'm wondering if the size of the pan might be affecting your bread? I'm thinking that a couple of smaller/shorter loaves might be better than the one that keeps overflowing. Let me know if you figure it out. I'm wondering if the ingredient substitutions are making this big a difference in the rise times too.
Just made this bread! out of this world! My son has just been
diagnosed with a sensitivity to gluten and finding a soft bread
for school sandwiches is like searching for a needle in….
We both love it and are thrilled!!
Oh, and the bread came out looking so professional, I feel like
the cat's whiskers lol
thank you so very much for sharing you are amazing!