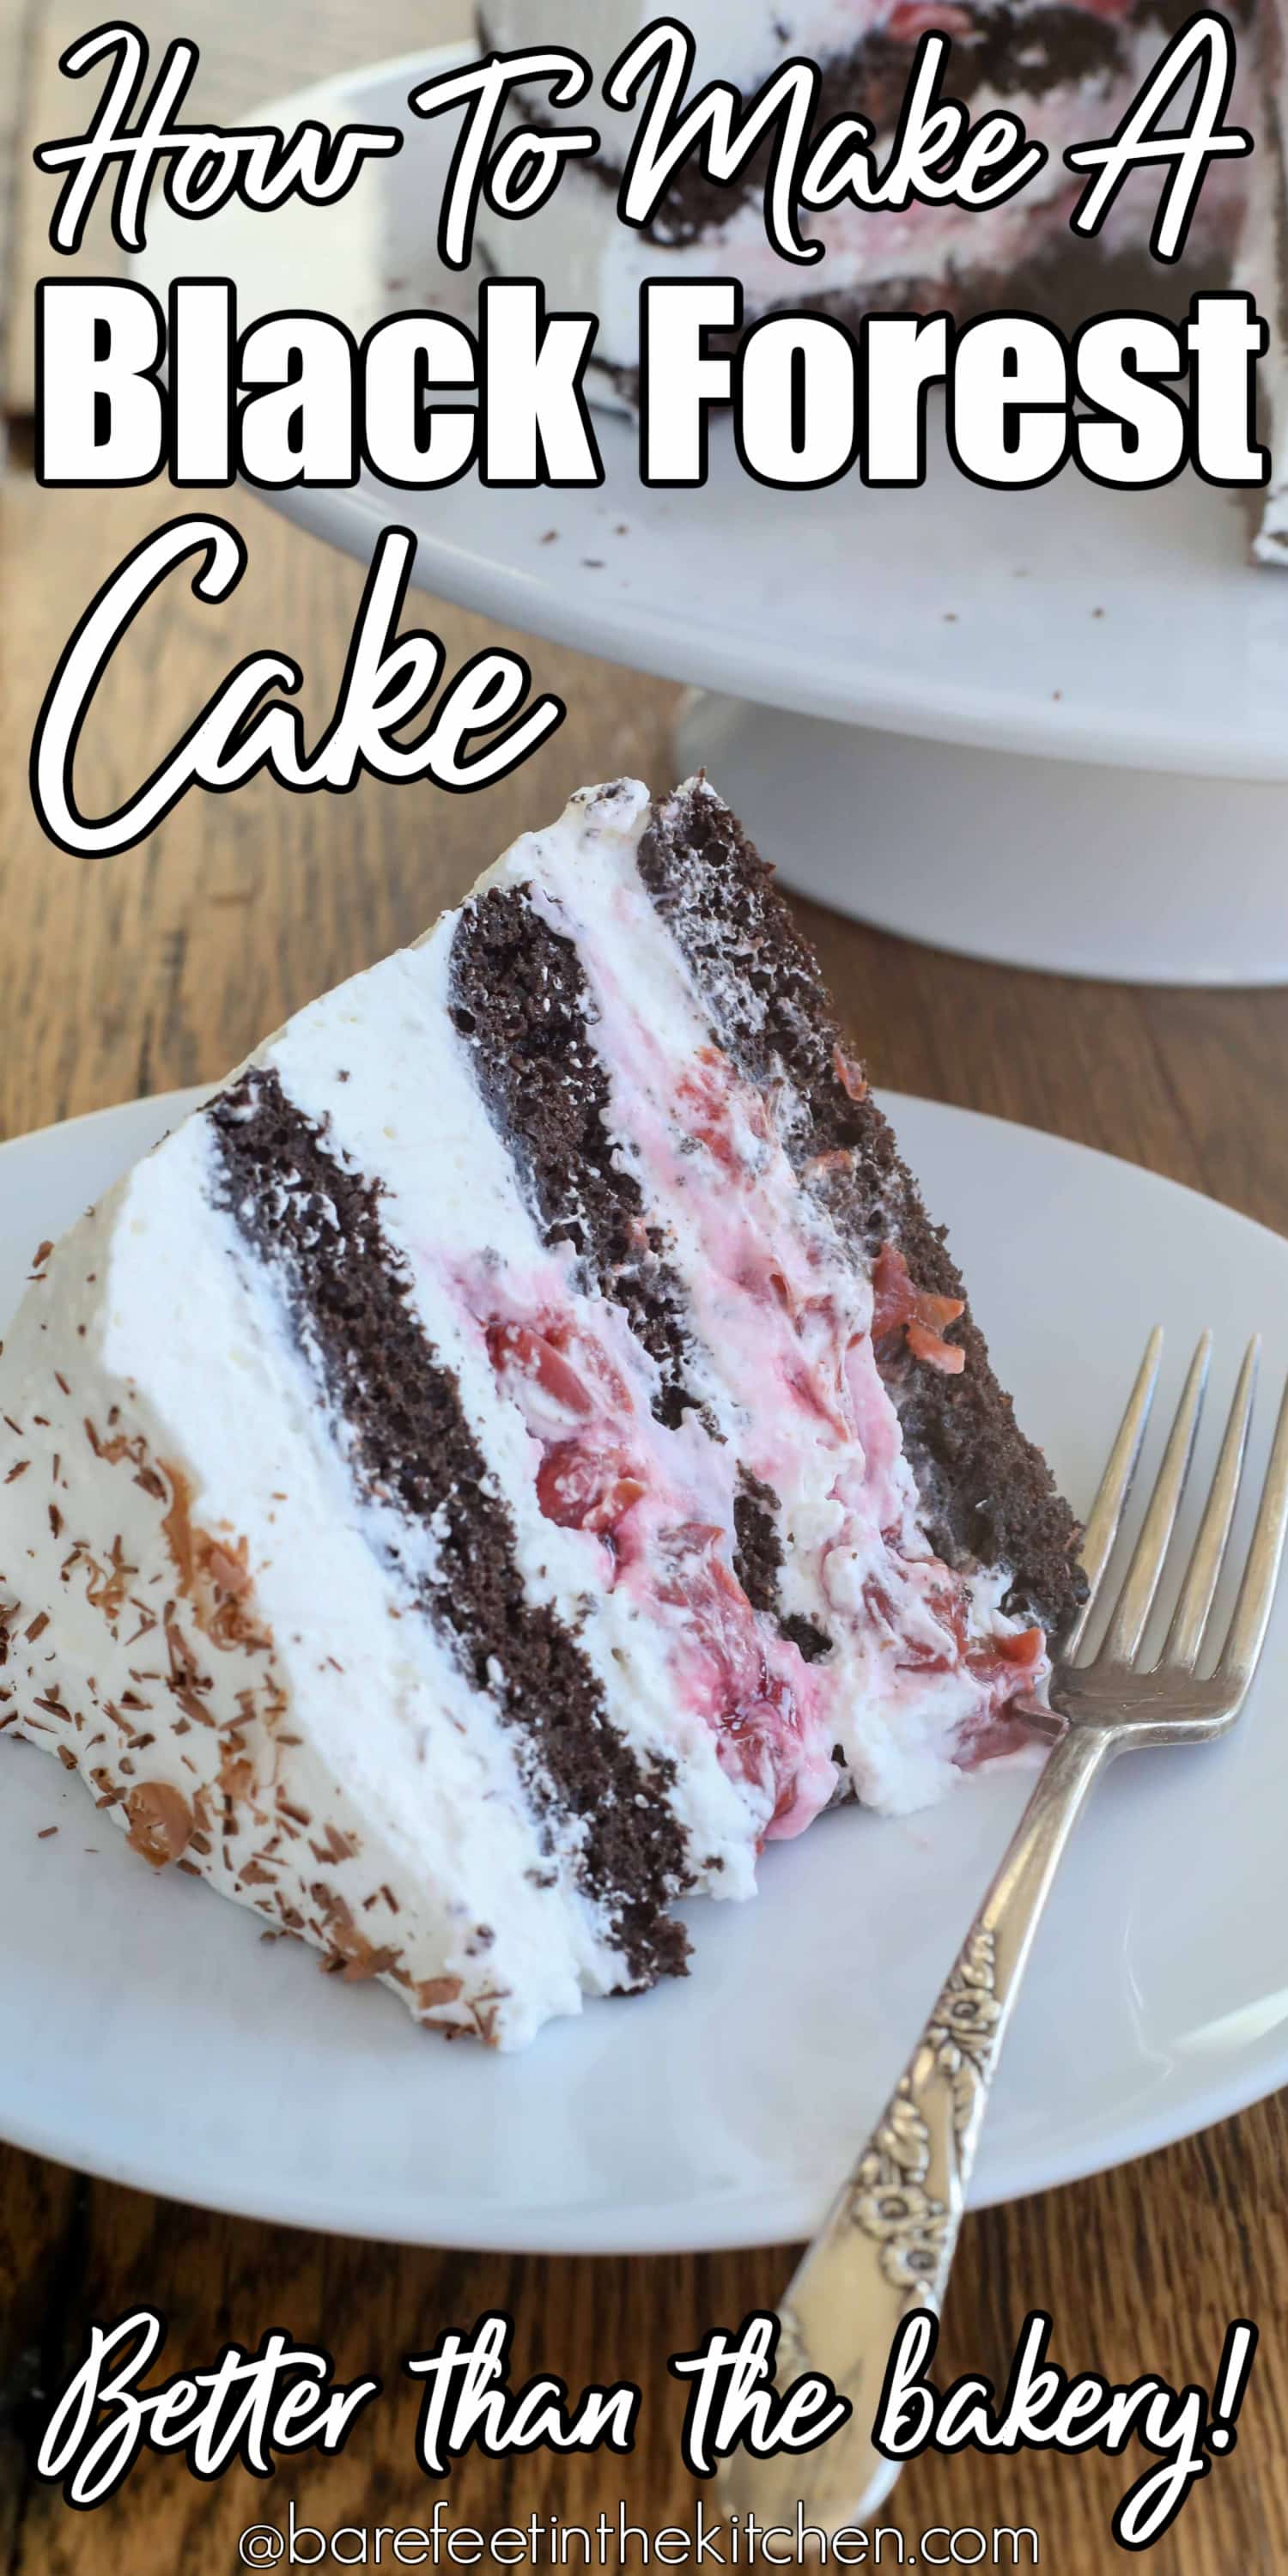
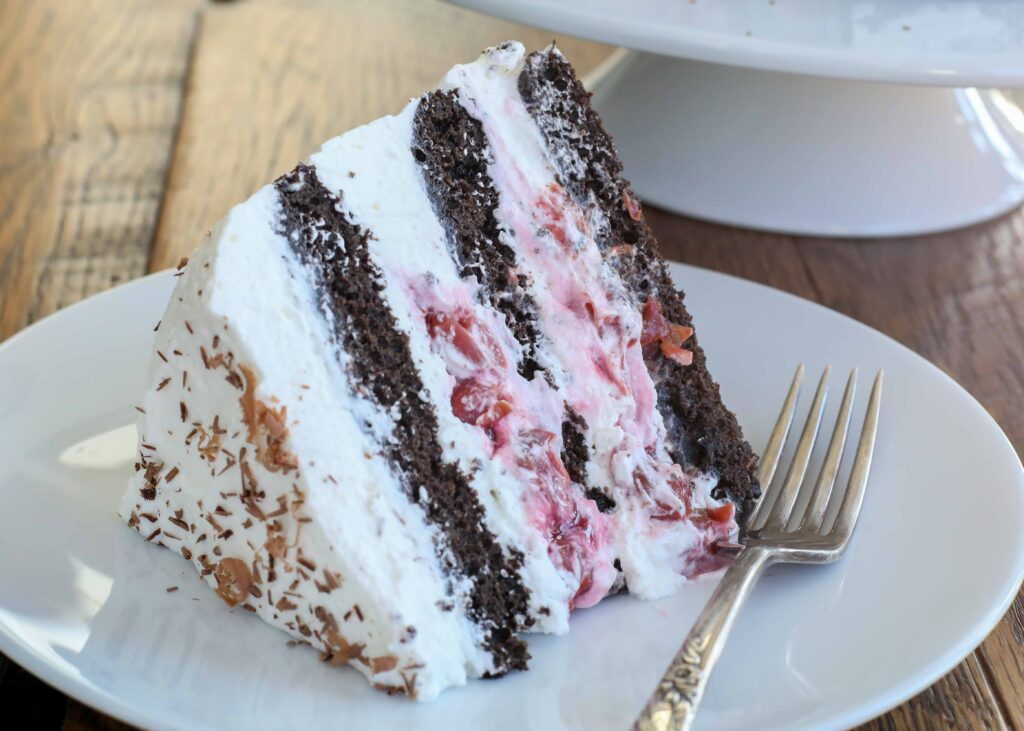
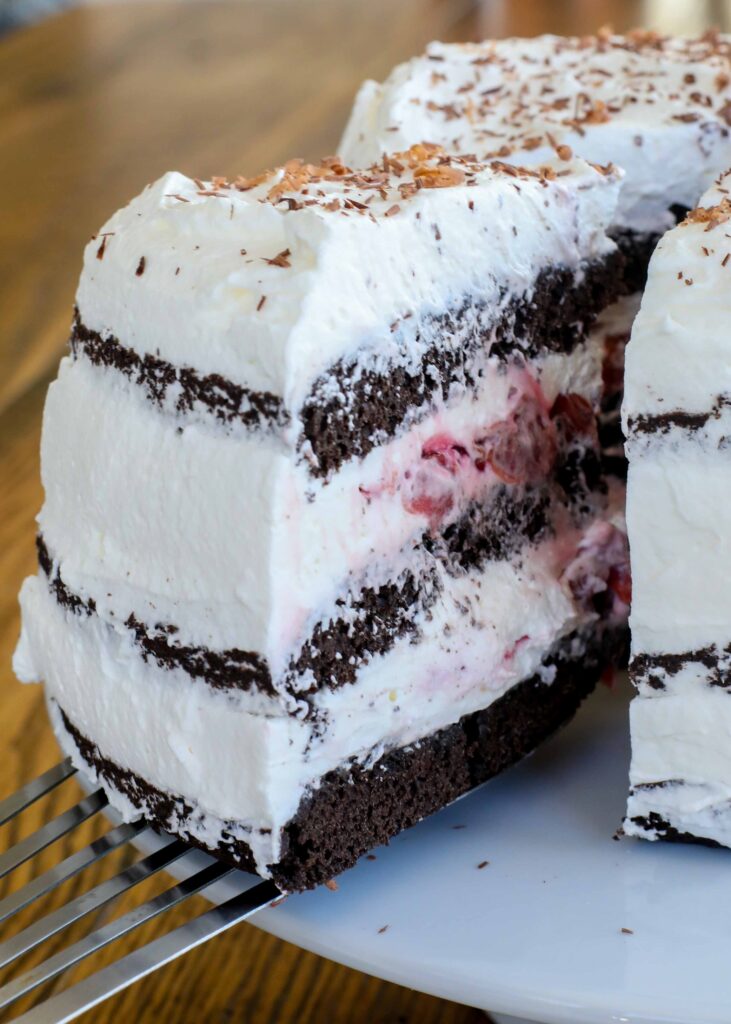
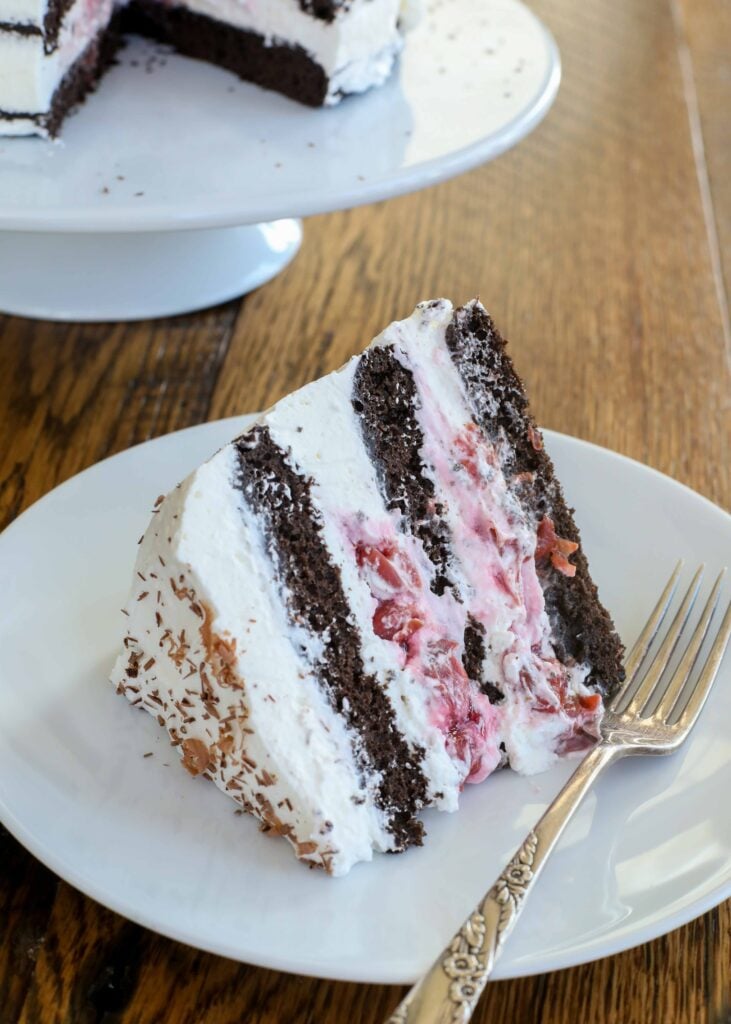
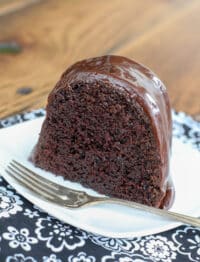
Tart cherries in sweet syrup are placed between layers of rich chocolate cake, along with an abundance of barely sweetened whipped cream to make this Black Forest Cake.
This cake has been Sean’s birthday request for almost as long as I can remember. He loves a Black Forest Cake.
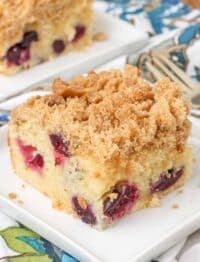
Black Forest Cherry Cake
Traditionally, Black Forest Cake is made with a German chocolate cake that is a bit dry and it’s supposed to be that way, as it’s balanced by juicy cherries and a whole lot of whipped cream.
However, after ordering this cake from bakeries for so many years and also making countless versions of the cake, we all agree that a rich, moist, slightly dense, homemade chocolate cake is our favorite way to make this cake.
Oh, and extra whipped cream – we are all about loads of extra whipped cream for this cake.
Black Forest Cake Recipe
I’ve made “mock” versions of the cake that were very simple (and still delicious) and I’ve made super complicated recipes as well. This recipe has become my go-to Black Forest Cake for his birthday and any other cake-worthy occasion.
Please please please don’t let the very long instructions or ingredient list fool you. It’s truthfully simpler than it sounds. I’m just giving you very detailed directions.
You really can trust me on this, because after ten years of sharing my favorite recipes here on Barefeet in the Kitchen, you know that I am not a fan of complicated desserts or fancy cake making at all!
I’m walking you through the entire cake making process today with a whole lot of step by step photos.
The process really is easier than you might think and I promise you that you can do this!
How To Make Black Forest Cake
First, you’ll make the cherry syrup filling. Next, you’ll bake the chocolate cake layers.
(Don’t panic along the way, the cake layers are very thin and supposed to be that way. It allows plenty of space for fluffy whipped cream and cherries between them.)
Last, you’ll whip some heavy cream and layer everything together. There’s no need to pretty this cake up but go for it, if that’s your thing.
Me? I’m all about the deliciousness with just the whipped cream and nothing fussier.
If you want to decorate the cake, fresh cherries, chocolate shavings or sprinkles, pretty piped whipped cream, anything you like will work here.
Cherry Filling Instructions
- In a medium-size saucepan, combine ¼ cup of the reserved sour cherry water, kirsch, and sugar. Bring to a simmer, while stirring frequently. While heating the mixture, combine the cornstarch and the remaining ¼ cup of cherry water in a small glass or bowl. Whisk until smooth. Set aside.
- When the liquids on the stove are simmering and the sugar has dissolved, stir in the cornstarch mixture and continue simmering while stirring constantly. Cook 1-2 minutes, until the liquid has thickened and coats the spoon.
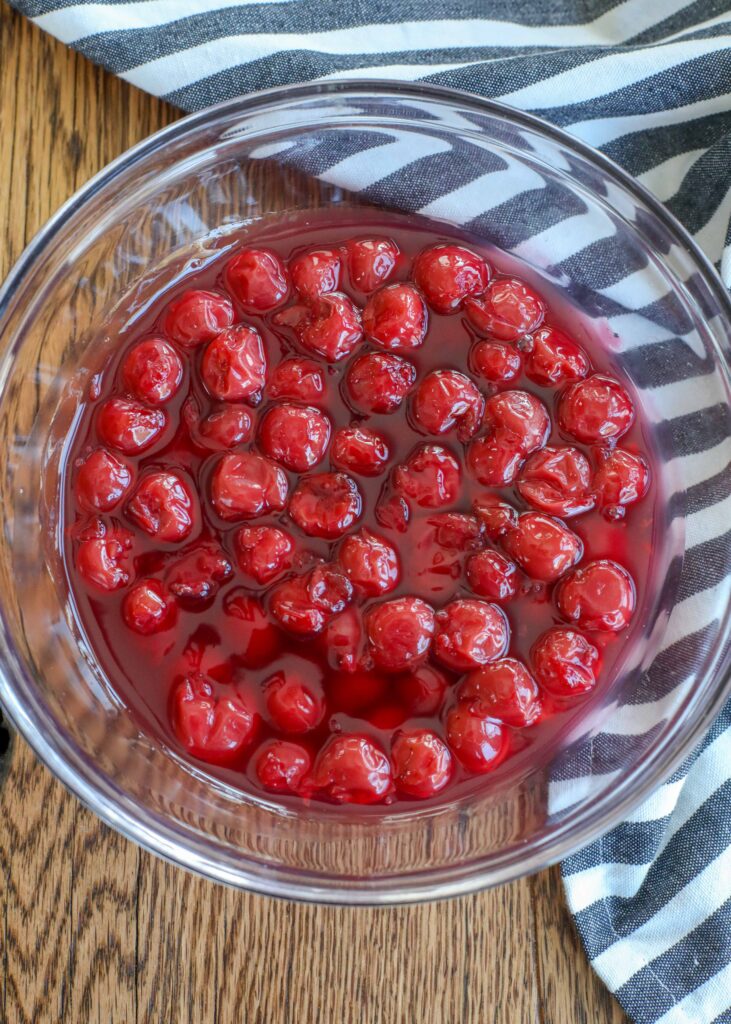
- Remove the pan from the heat and add the drained cherries. Stir to coat the cherries and set aside to cool completely.
Chocolate Cake Instructions
- Preheat the oven to 325°F. Generously grease the bottom and sides of (3) 8 or 9-inch round pans with butter. Trace the bottom of the pans onto wax paper or parchment with a pencil and then cut out the circles. Place the paper in the bottom of each pan.
- In a large mixing bowl, combine the sugar and butter and beat with an electric mixer until smooth and fluffy. Add the eggs, 2 at a time, mixing in between each addition. Add the vanilla extract and beat until creamy and smooth.
- In a separate bowl, whisk together the flour, cocoa, baking powder, and salt. Gradually add the dry ingredients to the mixing bowl and beat to combine. Divide the cake batter between the prepared pans as evenly as possible. (These should be very thin layers.)
- Bake for 15-16 minutes, until a toothpick inserted in the center of the cake comes out clean. Take care not to overbake or these thin layers of cake will be dry. Remove from the oven and let the cakes cool in the pans for 20 minutes. Invert the cakes onto wire racks and allow them to cool completely.
Whipped Cream Instructions
- In a large mixing bowl, beat the cream with the whisk attachment of an electric mixer until soft peaks form.
- Add the powdered sugar and continue beating until stiff peaks form.
Assembly Instructions
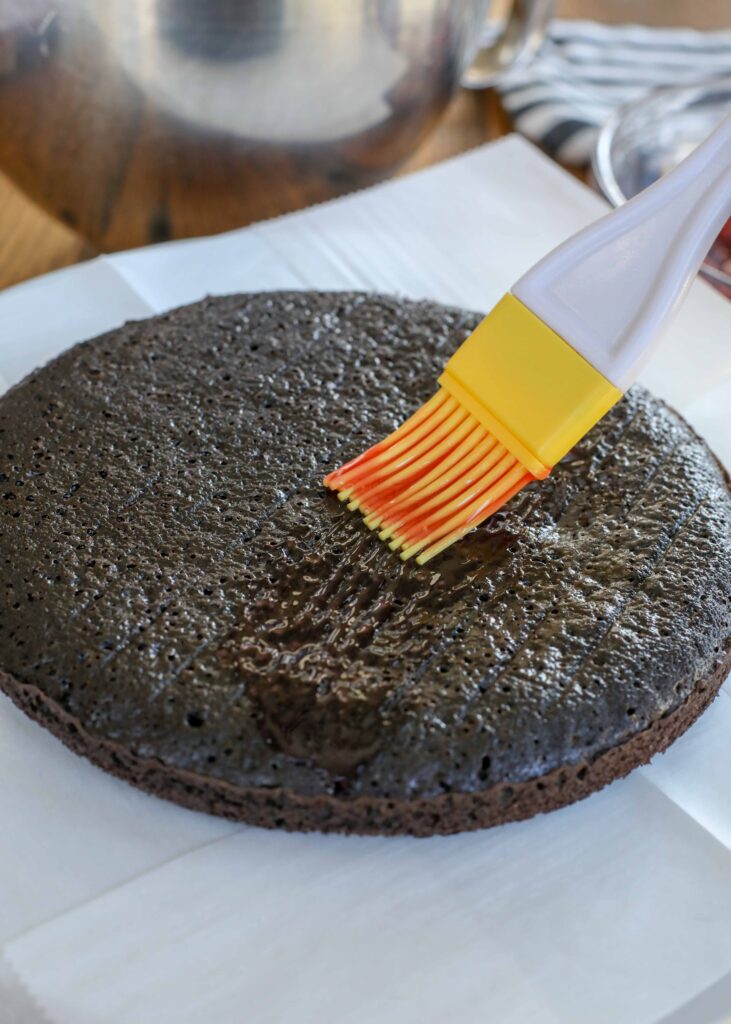
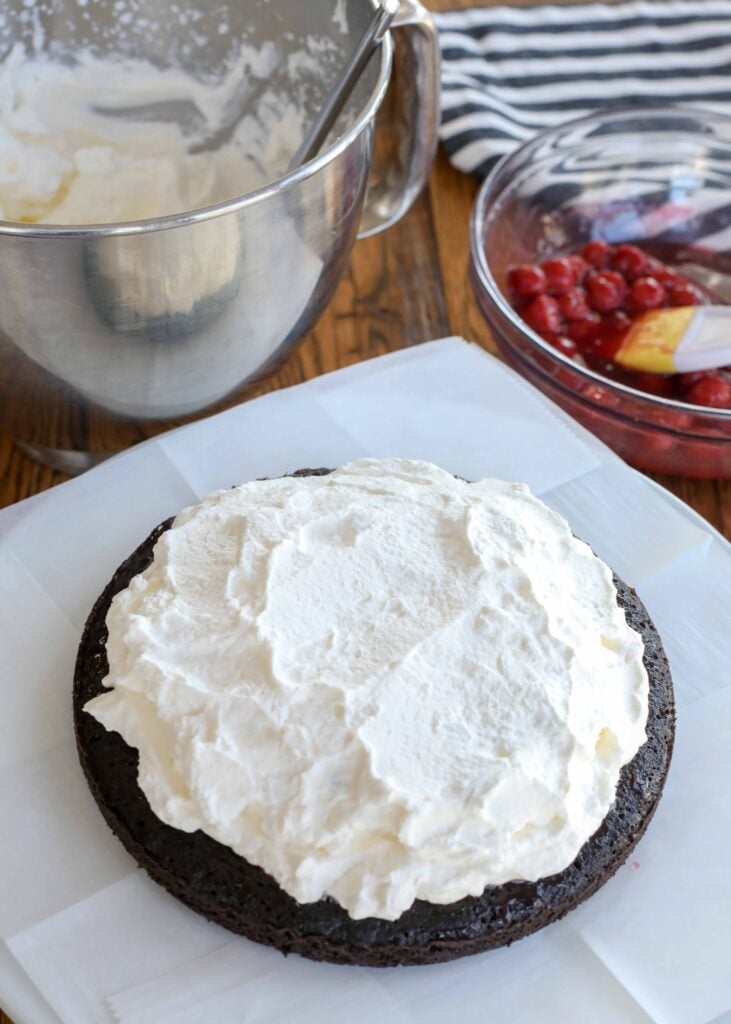
- Place a layer of the cake on a cake stand and use a pastry brush to brush lightly with the syrup from the cherry mixture, about 2 tablespoons worth of syrup.
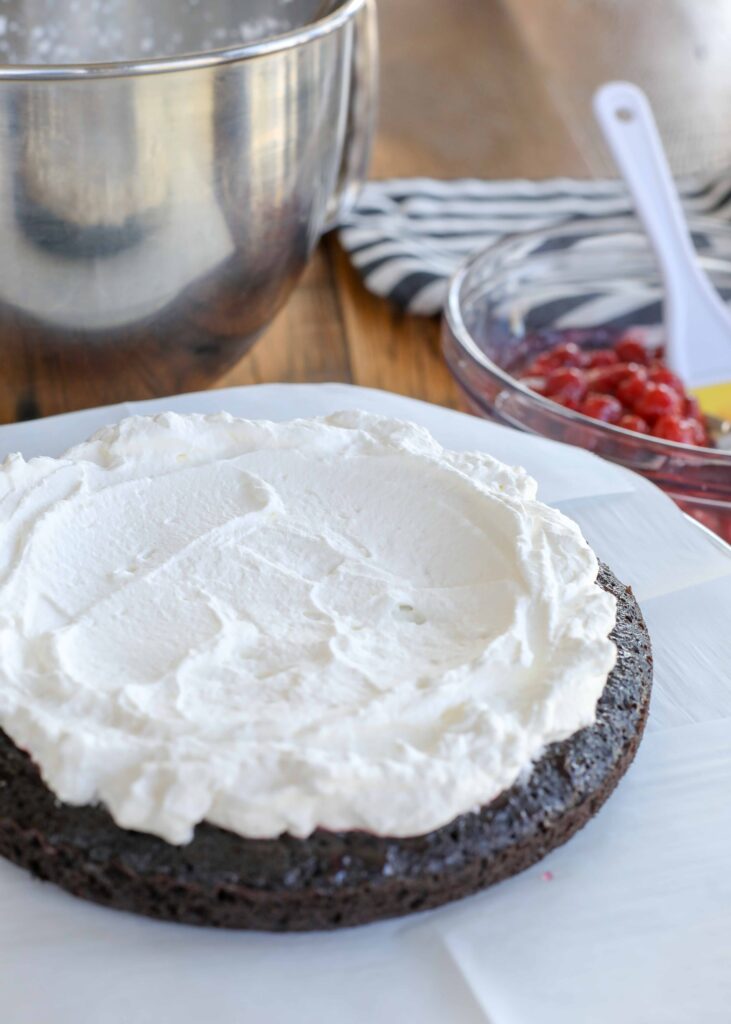
- Scoop about 1 cup of whipped cream onto the cake layer. Spread the whipped cream across the cake, leaving a ring of extra whipped cream at the edges. (This creates a barrier to prevent the cherry filling from dripping down the sides of the cake.)

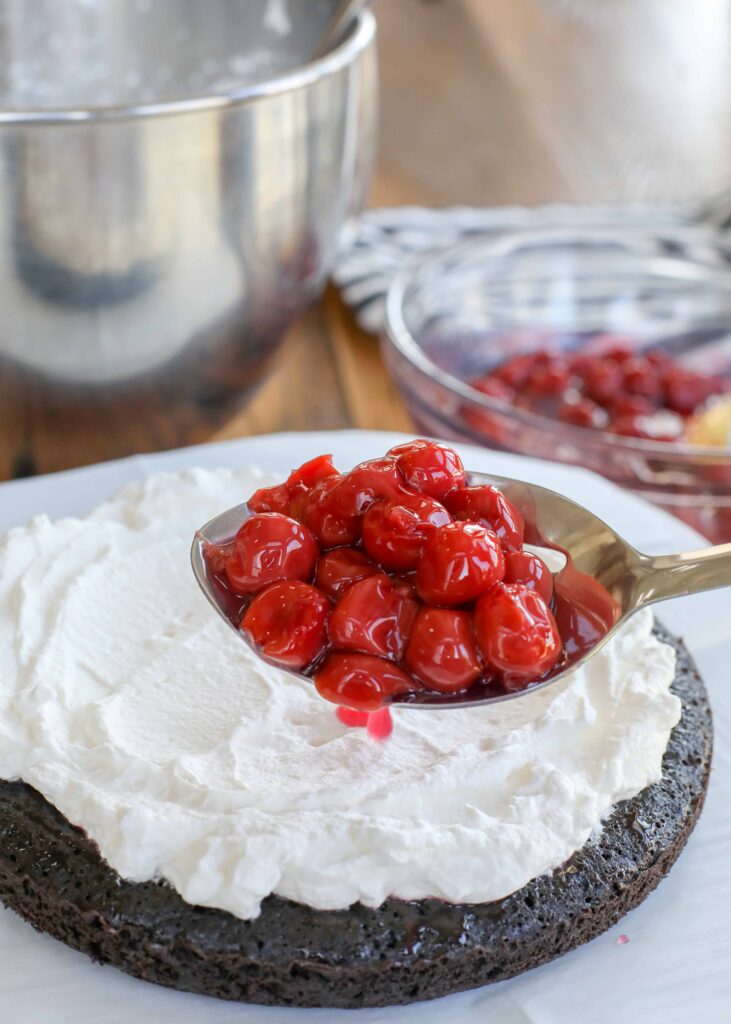
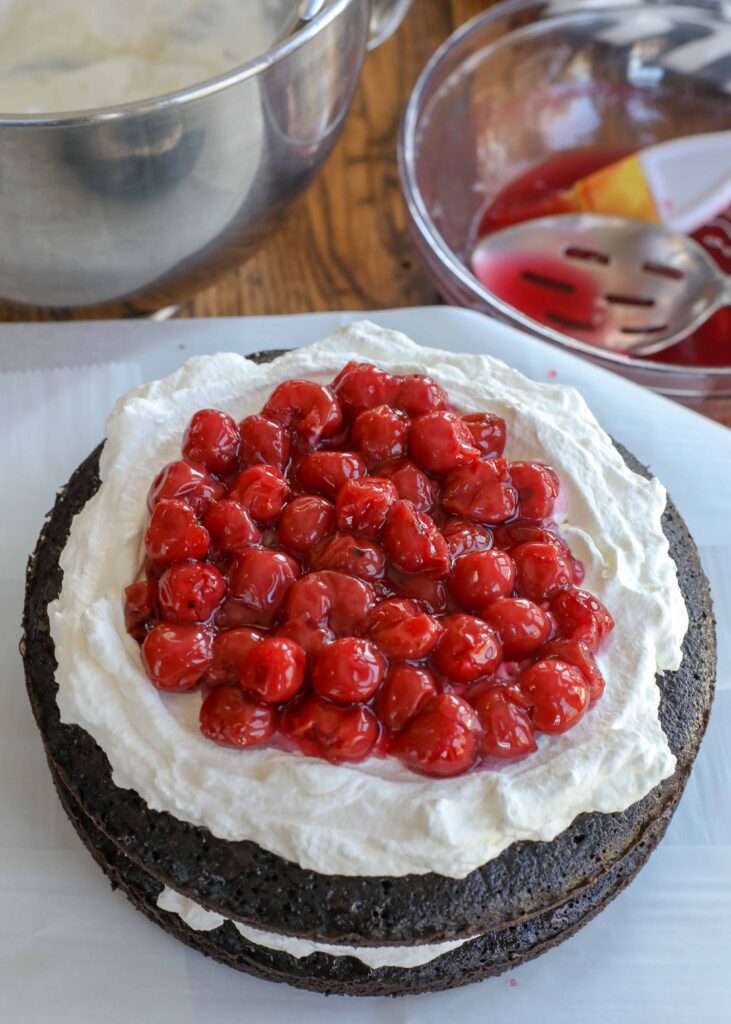
- Use a slotted spoon to transfer half of the cherries (without any extra liquid) over the whipped cream.
- Spoon an additional cup of whipped cream over the cherries and gently spread to cover the cherries.
- Place the second layer of cake over the whipped cream and repeat this process.
- Place the last layer of cake on top and lightly brush with syrup. Top with the remaining whipped cream (about 2 cups worth).
- Spread the whipped cream over the top and sides of the cake. Refrigerate for at least 4 hours before serving.
- Before serving, top with shaved chocolate and/or fresh cherries, if desired. Store in an airtight container in the refrigerator for 2-3 days.

Substitute for Kirsch Liqueur
If you are unable to bake with alcohol or would simply like to avoid purchasing special alcohol just for this recipe, you can substitute cherry juice or cherry vodka. (Depending on what you use, it might make the cake a little bit sweeter.)
You can also skip the Kirsch and simply add an additional ¼ cup of liquid from the can of sour cherries.
All of that said? There is nothing else that will 100% replace the unmistakable “black forest cake flavor” provided by the kirsch liqueur in this recipe.

Black Forest Cake
Ingredients
Cherry Filling Ingredients
- 1 tablespoon cornstarch
- 1/2 cup liquid from the can of sour cherries, divided
- 1/4 cup kirsch liqueur
- 1/3 cup sugar
- 14.5 ounces canned red tart cherries in water, drained with liquids reserved
Cake Ingredients
- 1 cup sugar
- 1/3 cup butter, room temperature
- 6 eggs
- 1 teaspoon vanilla extract
- 1 1/4 cup all-purpose flour
- 1/2 cup dutch-process cocoa powder
- 2 teaspoons baking powder
- 1/2 teaspoon kosher salt
Whipped Cream Ingredients
- 3 cups heavy whipping cream
- 1/4 cup powdered sugar
Instructions
Cherry Filling Instructions
- In a medium-size saucepan, combine ¼ cup of the reserved cherry water, kirsch, and sugar. Bring to a simmer, while stirring frequently. While heating the mixture, combine the cornstarch and the remaining ¼ cup of cherry water in a small glass or bowl. Whisk until smooth. Set aside.
- When the liquids on the stove are simmering and the sugar has dissolved, stir in the cornstarch mixture and continue simmering while stirring constantly. Cook 1-2 minutes, until the liquid has thickened and coats the spoon.
- Remove the pan from the heat and add the drained cherries. Stir to coat the cherries and set aside to cool completely.
Chocolate Cake Instructions
- Preheat the oven to 325°F. Generously grease the bottom and sides of (3) 8 or 9-inch round pans with butter. Trace the bottom of the pans onto wax paper or parchment with a pencil and then cut out the circles. Place the paper in the bottom of each pan.
- In a large mixing bowl, combine the sugar and butter and beat with an electric mixer until smooth and fluffy. Add the eggs, 2 at a time, mixing in between each addition. Add the vanilla extract and beat until creamy and smooth.
- In a separate bowl, whisk together the flour, cocoa, baking powder, and salt. Gradually add the dry ingredients to the mixing bowl and beat to combine. Divide the cake batter between the prepared pans as evenly as possible. (These should be very thin layers.)
- Bake for 15-16 minutes, until a toothpick inserted in the center of the cake comes out clean. Take care not to overbake or these thin layers of cake will be dry. Remove from the oven and let the cakes cool in the pans for 20 minutes. Invert the cakes onto wire racks and allow them to cool completely.
Whipped Cream Instructions
- In a large mixing bowl, beat the cream with the whisk attachment of an electric mixer until soft peaks form. Add the powdered sugar and continue beating until stiff peaks form.
Assembly Instructions
- Place a layer of the cake on a cake stand and use a pastry brush to brush lightly with the syrup from the cherry mixture, about 2 tablespoons worth of syrup.
- Scoop about 1 cup of whipped cream onto the cake layer. Spread the whipped cream across the cake, leaving a ring of extra whipped cream at the edges. (This creates a barrier to prevent the cherry filling from dripping down the sides of the cake.)
- Use a slotted spoon to transfer half of the cherries (without any extra liquid) over the whipped cream. Spoon an additional cup of whipped cream over the cherries and gently spread to cover the cherries. Place the second layer of cake over the whipped cream and repeat this process.
- Place the last layer of cake on top and lightly brush with syrup. Top with the remaining whipped cream (about 2 cups worth). Spread the whipped cream over the top and sides of the cake. Refrigerate for at least 4 hours before serving.
- Before serving, top with shaved chocolate and/or fresh cherries, if desired. Store in an airtight container in the refrigerator for 2-3 days. Enjoy!
Nutrition


Ria Brits says
This is absolutely the best ever recipies. Really love all your flavours. Fits me 100. Thanks for sharing with me.
Mary Younkin says
Thank you, Ria. I agree this cake is so good!
Cindy says
Hi. Is it of cups whipped cream before it’s whipped?
Thank you
Mary Younkin says
Yes, that is the amount of heavy cream before whipping.
Cindy says
Hi I’m making this for New Years Eve is it best to bake it the day before or do you recommend day of?
Thank you. I make a lot of your recipes and they all turn out great
Happy New Years
Mary Younkin says
I typically bake this the day before or morning before I want to serve it, Cindy.
Cindy says
So delicious and not too hard to make. Was a hit at our New Years Eve dinner. It did lean a bit but that’s ok it tasted great. Definitely making again
Mary Younkin says
Leaning layered cakes can be problematic for sure, Cindy. But I am so happy everyone enjoyed it so much.